Overengineering a mirror - Part 1: PXE-booting a k3s cluster
From the last years, I started to gain interest in another new hobby: dancing. Naturally, I would like to practice at home. The ideal environment would be a large empty room with a full size mirror on the wall, but I live in Paris so the rent is very expensive and thus I do not have this kind of space, actually I do not even have any free wall without any furniture where I could place a mirror.
So, there was two problems: getting enough empty space to move, and getting some kind of visual feedback.
The free space problem can be solved quite easily by lifting my bed against the wall (see the next parts of this series). But for the mirror, I wanted to take advantage of my existing infrastructure and software development background.
This is the first part of a series of 3 posts:
- Part 1: Network Booting
- Part 2: Hardware Setup
- Part 3: K8s Deployment
The Idea
While I do not have any free space on my walls, I do have a quite large TV in front of my bed. I also happen to have an old Kinect (v2) laying around, so with the help of a tiny computer I could place the Kinect on top of the tv, capture the video from the kinect and display it directly on the TV.
But where is the fun if there’s no overly-complex infra involved ?
So, I decided to package the application capturing and restreaming the Kinect video as a container and deploy this container in my k3s cluster.
I already have a k3s master node on my proxmox server (installed using packer/terraform/fluxcd), so I can just add my mini-PC as another node on this cluster. And since we want some complexity (-and to learn a few new things), I decided to make this mini-PC use network boot (with PXE and iSCSI) to boot from a pre-configured disk image for the cluster (generated using packer) on my storage server.
Initially I wanted to go with the Raspberry Pi 4 (as the Kinect V2 uses a much higher USB bandwidth than the Kinect V1 and thus requires a USB 3 port), but it just wasn’t powerful enough (got around 7-14 fps, depending on the power supply). So I bought a Dell OptiPlex 3050 Tiny: since I wanted to test this kind of mini PC for a while, this was a good pretext.
Since the configuration is a bit different between the mini-PC (amd64) and the rpi (arm64), I will show the network boot process for both.
Network Boot
Boot Process
There are multiple stages to boot using the network:
- First you must configure the device to use network boot (as this is usually not enabled by default)
- Then, when booting, the device will send a DHCP request (DHCPDISCOVER), with additional fields and options for PXE
- The DHCP server then responds with the proposed IP-address (DHCPOFFER) and additional PXE parameters
- The client accepts the DHCP offer (DHCPREQUEST + DHCPACK), fetches the Bootfile on the specified TFTP server and loads it
- For Linux (the only case exposed here), the kernel and initramfs will be fetched from the TFTP server by the bootfile and then be loaded
- Then, the iSCSI drive will be mounted as the root path and the system will finish starting up
Creating disk images
To make disk image easily buildable and reproducibles, I will use Hashicorp’s Packer tool (that I’m already using to build my cloud-init images for k3s on proxmox).
For amd64 devices
For the amd64 devices, I will use the debian installer to create the image.
We first need to import the qemu builder in packer:
packer {
  required_plugins {
    qemu = {
      version = "~> 1"
      source  = "github.com/hashicorp/qemu"
    }
  }
}
Make sure you also have qemu installed and that you have the required OMVF files for the UEFI VM firmware.
We can then define a source and a builder:
source "qemu" "amd64_uefi" {
  iso_url           = var.iso_url
  iso_checksum      = var.iso_checksum
  output_directory  = "output/qemu_amd64_uefi"

  shutdown_command = "poweroff"
  disk_size         = "5G"
  memory            = "4096"
  cpus              = 4
  machine_type    = "q35"
  format            = "raw"
  accelerator       = "kvm"

  vm_name = "debian"
  efi_boot         = true
  efi_firmware_code = "/usr/share/edk2/x64/OVMF_CODE.4m.fd"
  efi_firmware_vars = "/usr/share/edk2/x64/OVMF_VARS.4m.fd"
  //headless = true

  ssh_username      = "root"
  ssh_password      = "packer"
  ssh_timeout       = "20m"

  // see: https://developer.hashicorp.com/packer/guides/automatic-operating-system-installs/preseed_ubuntu
  http_directory = "http"
  http_port_min  = 8100
  http_port_max  = 8100

  boot_wait         = "5s"
  boot_command = [
    "<wait>c<wait>",
    "linux /install.amd/vmlinuz ",
    "auto=true ",
    "url=http://{{ .HTTPIP }}:{{ .HTTPPort }}/qemu_uefi_preseed.cfg ",
    "hostname=${var.template_name} ",
    "domain=lan ",
    "interface=auto ",
    "vga=788 noprompt quiet --<enter>",
    "initrd /install.amd/initrd.gz<enter>",
    "boot<enter>"
  ]
}

build {
  name = "debian_image"

  sources = ["source.qemu.amd64_uefi"]

  # Run our install script
  provisioner "shell" {
    script = "./scripts/install.sh"
    environment_vars = [
      "K3S_VERSION=${var.k3s_version}",
      "K3S_TOKEN=${var.k3s_token}",
      "K3S_URL=${var.k3s_url}",
      "INSTALL_K3S=true",
      "INSTALL_ISCSI=true",
      "INSTALL_DYNHOSTNAME=true"
    ]
  }

  provisioner "file" {
    content = join("\n", var.authorized_keys)
    destination = "/root/.ssh/authorized_keys"
  }

  provisioner "shell" {
    # make login public key only
    inline = [
      "chmod 600 /root/.ssh/authorized_keys",
      "sed -i 's/^PasswordAuthentication yes/PasswordAuthentication no/' /etc/ssh/sshd_config",
      "sed -i 's/^PermitRootLogin yes/PermitRootLogin prohibit-password/' /etc/ssh/sshd_config",
    ]
  }
}
The http options allows to create a local http server that serves the files located in the “http” folder (relative to our packer script). This will be used to load our preseed file.
http_directory = "http"
http_port_min  = 8100
http_port_max  = 8100
Then, the boot_command sets the command that will be executed immediately when the VM boots, the command is entered directly on the console using an emulated keyboard. The “url” parameter specifies the path to our preseed file (with the HTTPIP and HTTPPort being automatically replaced by packer by the running server params).
boot_command = [
    "<wait>c<wait>",
    "linux /install.amd/vmlinuz ",
    "auto=true ",
    "url=http://{{ .HTTPIP }}:{{ .HTTPPort }}/qemu_uefi_preseed.cfg ",
    "hostname=${var.template_name} ",
    "domain=lan ",
    "interface=auto ",
    "vga=788 noprompt quiet --<enter>",
    "initrd /install.amd/initrd.gz<enter>",
    "boot<enter>"
]
The preseed file is the file that we can load in the debian installer to enable unattended installations. Most of this file is copied from the example provided by debian.
# Inspired from: https://www.debian.org/releases/stable/example-preseed.txt (trixie)

#_preseed_V1
#### Contents of the preconfiguration file (for trixie)
### Localization
# Preseeding only locale sets language, country and locale.
d-i debian-installer/locale string en_US.UTF-8

# Keyboard selection.
d-i keyboard-configuration/xkb-keymap select fr

### Network configuration

# netcfg will choose an interface that has link if possible. This makes it
# skip displaying a list if there is more than one interface.
d-i netcfg/choose_interface select auto

# To pick a particular interface instead:
#d-i netcfg/choose_interface select ens18

# Any hostname and domain names assigned from dhcp take precedence over
# values set here. However, setting the values still prevents the questions
# from being shown, even if values come from dhcp.
d-i netcfg/get_hostname string unassigned-hostname
d-i netcfg/get_domain string unassigned-domain

# Disable that annoying WEP key dialog.
d-i netcfg/wireless_wep string
# The wacky dhcp hostname that some ISPs use as a password of sorts.
#d-i netcfg/dhcp_hostname string radish

### Mirror settings
# Mirror protocol:
# If you select ftp, the mirror/country string does not need to be set.
# Default value for the mirror protocol: http.
#d-i mirror/protocol string ftp
d-i mirror/country string France
d-i mirror/http/hostname string ftp.fr.debian.org
d-i mirror/http/directory string /debian
d-i mirror/http/proxy string

# Skip creation of a normal user account.
d-i passwd/make-user boolean false

# Root password
d-i passwd/root-password password packer
d-i passwd/root-password-again password packer

### Clock and time zone setup

# Controls whether or not the hardware clock is set to UTC.
d-i clock-setup/utc boolean true

# You may set this to any valid setting for $TZ; see the contents of
# /usr/share/zoneinfo/ for valid values.
d-i time/zone string EU/Paris

# Controls whether to use NTP to set the clock during the install
d-i clock-setup/ntp boolean true

### Partitioning
## Partitioning example
# If the system has free space you can choose to only partition that space.
# This is only honoured if partman-auto/method (below) is not set.
#d-i partman-auto/init_automatically_partition select biggest_free

# Alternatively, you may specify a disk to partition. If the system has only
# one disk the installer will default to using that, but otherwise the device
# name must be given in traditional, non-devfs format (so e.g. /dev/sda
# and not e.g. /dev/discs/disc0/disc).
# For example, to use the first SCSI/SATA hard disk:
#d-i partman-auto/disk string /dev/sda
# In addition, you'll need to specify the method to use.
# The presently available methods are:
# - regular: use the usual partition types for your architecture
# - lvm:     use LVM to partition the disk
# - crypto:  use LVM within an encrypted partition
d-i partman-auto/method string regular

# You can choose one of the predefined partitioning recipes:
# - atomic: all files in one partition
# - home:   separate /home partition
# - multi:  separate /home, /var, and /tmp partitions
# - server: separate /var and /srv partitions; swap limitted to 1G
# - small_disk: scheme dedicated to small harddrives (under 10GB)
d-i partman-basicfilesystems/no_swap boolean false
d-i partman-auto/expert_recipe string myroot :: 512 512 512 fat32 \
     $primary{ } $bootable{ } method{ efi } \
     format{ } \
    . \
    1000 50 -1 ext4 \
     $primary{ } method{ format } \
     format{ } use_filesystem{ } filesystem{ ext4 } \
     mountpoint{ / } \
    .
d-i partman-auto/choose_recipe select myroot

# This makes partman automatically partition without confirmation, provided
# that you told it what to do using one of the methods above.
d-i partman-partitioning/confirm_write_new_label boolean true
d-i partman/choose_partition select finish
d-i partman/confirm boolean true
d-i partman/confirm_nooverwrite boolean true

### Base system installation
# Configure APT to not install recommended packages by default. Use of this
# option can result in an incomplete system and should only be used by very
# experienced users.
d-i base-installer/install-recommends boolean false

### Apt setup
# Choose, if you want to scan additional installation media
# (default: false).
d-i apt-setup/cdrom/set-first boolean false
# You can choose to install non-free and contrib software.
d-i apt-setup/non-free boolean true
d-i apt-setup/contrib boolean true
# Uncomment the following line, if you don't want to have the sources.list
# entry for a DVD/BD installation image active in the installed system
# (entries for netinst or CD images will be disabled anyway, regardless of
# this setting).
d-i apt-setup/disable-cdrom-entries boolean true

### Package selection
tasksel tasksel/first multiselect standard, ssh-server

popularity-contest popularity-contest/participate boolean false

### Boot loader installation
# Grub is the boot loader (for x86).

# This is fairly safe to set, it makes grub install automatically to the UEFI
# partition/boot record if no other operating system is detected on the machine.
d-i grub-installer/only_debian boolean true

# This one makes grub-installer install to the UEFI partition/boot record, if
# it also finds some other OS, which is less safe as it might not be able to
# boot that other OS.
d-i grub-installer/with_other_os boolean true

# Due notably to potential USB sticks, the location of the primary drive can
# not be determined safely in general, so this needs to be specified:
d-i grub-installer/bootdev  string default
# To install to the primary device (assuming it is not a USB stick):
#d-i grub-installer/bootdev  string default

# Use the following option to add additional boot parameters for the
# installed system (if supported by the bootloader installer).
# Note: options passed to the installer will be added automatically.
#d-i debian-installer/add-kernel-opts string nousb

### Finishing up the installation
# During installations from serial console, the regular virtual consoles
# (VT1-VT6) are normally disabled in /etc/inittab. Uncomment the next
# line to prevent this.
#d-i finish-install/keep-consoles boolean true

# Avoid that last message about the install being complete.
d-i finish-install/reboot_in_progress note

#### Advanced options
### Running custom commands during the installation
# d-i preseeding is inherently not secure. Nothing in the installer checks
# for attempts at buffer overflows or other exploits of the values of a
# preconfiguration file like this one. Only use preconfiguration files from
# trusted locations! To drive that home, and because it's generally useful,
# here's a way to run any shell command you'd like inside the installer,
# automatically.

# This first command is run as early as possible, just after
# preseeding is read.
#d-i preseed/early_command string anna-install some-udeb
# This command is run immediately before the partitioner starts. It may be
# useful to apply dynamic partitioner preseeding that depends on the state
# of the disks (which may not be visible when preseed/early_command runs).
#d-i partman/early_command \
#       string debconf-set partman-auto/disk "$(list-devices disk | head -n1)"
# This command is run just before the install finishes, but when there is
# still a usable /target directory. You can chroot to /target and use it
# directly, or use the apt-install and in-target commands to easily install
# packages and run commands in the target system.
#d-i preseed/late_command string apt-install zsh; in-target chsh -s /bin/zsh

# Enable root login over SSH (for packer)
d-i preseed/late_command string in-target sed -e 's/#PermitRootLogin prohibit-password/PermitRootLogin yes/' -i /etc/ssh/sshd_config
For partitioning, we’re using a custom recipe to add an EFI boot partition (in FAT32) and then use all of the remaining space for the root partition (EXT4). I wanted to explicitely disable the swap, but if you choose to keep it, make sure that you create the swap partition BEFORE the root partition, otherwise if will be difficult to expand the root filesystem later:
d-i partman-basicfilesystems/no_swap boolean false
d-i partman-auto/expert_recipe string myroot :: 512 512 512 fat32 \
     $primary{ } $bootable{ } method{ efi } \
     format{ } \
    . \
    1000 50 -1 ext4 \
     $primary{ } method{ format } \
     format{ } use_filesystem{ } filesystem{ ext4 } \
     mountpoint{ / } \
    .
d-i partman-auto/choose_recipe select myroot
At the end of the file, I also added a line to permit password login for packer to be able to ssh into the VM after the system install has finished:
d-i preseed/late_command string in-target sed -e 's/#PermitRootLogin prohibit-password/PermitRootLogin yes/' -i /etc/ssh/sshd_configOnce the initial system installation is completed, packer can ssh to the VM and execute our provisionners.
The first provisionner is used to execute our custom installation script, with some options to set the K3S version, and enable/disable some components.
The other provisionners are used to define authorized_keys and revert the sshd changes to re-enable publickey-only auth.
For Raspberry PIs
For the Raspberry PI, instead of creating a debian image from scratch, I’m using the raspios-lite official image (which is itself based on debian).
source "cross" "rpi_arm64" {
  file_checksum_type    = "sha256"
  file_checksum_url     = "https://downloads.raspberrypi.org/raspios_lite_arm64/images/raspios_lite_arm64-2025-12-04/2025-12-04-raspios-trixie-arm64-lite.img.xz.sha256"
  file_target_extension = "xz"
  file_unarchive_cmd    = ["xz", "--decompress", "$ARCHIVE_PATH"]
  file_urls             = ["https://downloads.raspberrypi.org/raspios_lite_arm64/images/raspios_lite_arm64-2025-12-04/2025-12-04-raspios-trixie-arm64-lite.img.xz"]
  image_build_method    = "resize"
  image_chroot_env      = ["PATH=/usr/local/bin:/usr/local/sbin:/usr/bin:/usr/sbin:/bin:/sbin"]
  // use fdisk -lu disk.img to find partition info
  image_partitions {
    filesystem   = "vfat"
    mountpoint   = "/boot"
    name         = "boot"
    size         = "512M"
    start_sector = "16384"
    type         = "c"
  }
  image_partitions {
    filesystem   = "ext4"
    mountpoint   = "/"
    name         = "root"
    size         = "0"
    start_sector = "1064960"
    type         = "83"
  }
  image_path                   = "output/rpi_arm64.img"
  image_size                   = "6G"
  image_type                   = "dos"
  qemu_binary_destination_path = "/usr/bin/qemu-aarch64-static"
  qemu_binary_source_path      = "/usr/bin/qemu-aarch64-static"
}

build {
  name = "rpi3_image"
  sources = ["source.cross.rpi_arm64"]

  # Run our install script
  provisioner "shell" {
    script = "./scripts/install.sh"
    environment_vars = [
      "K3S_VERSION=${var.k3s_version}",
      "K3S_TOKEN=${var.k3s_token}",
      "K3S_URL=${var.k3s_url}",
      "INSTALL_K3S=true",
      "INSTALL_ISCSI=true",
      "INSTALL_DYNHOSTNAME=true",
      "TARGET_PLATFORM=rpi",
    ]
  }

  provisioner "file" {
    content = join("\n", var.authorized_keys)
    destination = "/root/.ssh/authorized_keys"
  }

  provisioner "shell" {
    # make login public key only
    inline = [
      "chmod 600 /root/.ssh/authorized_keys",
      "sed -i 's/^PasswordAuthentication yes/PasswordAuthentication no/' /etc/ssh/sshd_config",
      "sed -i 's/^PermitRootLogin yes/PermitRootLogin prohibit-password/' /etc/ssh/sshd_config",
    ]
  }
}
Since the rpi architecture is different from my base system (x64), I used a custom builder for ARM:
- A few of them are listed on the packer docs
- The one that I actually settled with was this fork: https://github.com/michalfita/packer-plugin-cross which added support for the new packer plugin system
- The plugin relies on
qemu-aarch64-static, so make sure that this is installed on your machine
Import it with:
packer {
  required_plugins {
    cross = {
      version = ">= 1.1.3"
      source  = "github.com/michalfita/cross"
    }
  }
}
As the image file is compressed with xz, we need to add a custom command for extracting the downloaded image: file_unarchive_cmd = ["xz", "--decompress", "$ARCHIVE_PATH"]
We then need to map the partitions to match the ones defined in the raspios image, to do this:
- download the image and extract it
- run
fdisk -lu disk.img - create the partitions blocks and set the starting blocks and size accordingly
In my case, I ended up with this:
image_partitions {
    filesystem   = "vfat"
    mountpoint   = "/boot"
    name         = "boot"
    size         = "512M"
    start_sector = "16384"
    type         = "c"
  }
  image_partitions {
    filesystem   = "ext4"
    mountpoint   = "/"
    name         = "root"
    size         = "0"
    start_sector = "1064960"
    type         = "83"
  }
Since the installation of the base system is already done, we just need to run our install script and add our ssh keys.
In the install script, there are sections that are specific to RPis (activated with TARGET_PLATFORM=rpi), we’ll get to them in the next sections.
For now, the only ones worth mentionning are:
systemctl disable userconfig.servicethat is used to disable the userconfig service since we don’t want any additional configuration happening after the creation of the image by packer.K3S_EXEC="agent --node-taint droso/target-type=lowpower:NoSchedule"that is used to apply a taint on k3s nodes running on a raspberry pi. This is done in order to prevent scheduling by default, so that the little rpi only runs the containers that strictly requires running on it.
Installation Script
#!/bin/bash

set -e

# configure locale to en_US.UTF-8
export DEBIAN_FRONTEND=noninteractive
export LC_CTYPE=en_US.UTF-8
export LC_ALL=en_US.UTF-8

# install basic utils
echo "Installing basic utilities"
apt-get update && apt-get upgrade -y && apt-get install -y --no-install-recommends sudo nano curl wget htop ncdu nfs-common iptables

# install k3s agent
if [ "$INSTALL_K3S" == "true" ]; then
    echo "Installing k3s: $K3S_VERSION"
    wget https://get.k3s.io -O /root/get-k3s.sh
    chmod +x /root/get-k3s.sh

    if [ -z "$K3S_URL" ] || [ -z "$K3S_TOKEN" ]; then
        INSTALL_K3S_SKIP_ENABLE=true INSTALL_K3S_VERSION=$K3S_VERSION /root/get-k3s.sh
    else
        K3S_EXEC="agent"
        if [ "$TARGET_PLATFORM" == "rpi" ]; then
            K3S_EXEC="agent --node-taint droso/target-type=lowpower:NoSchedule"
        fi
        INSTALL_K3S_SKIP_START=true K3S_URL="$K3S_URL" K3S_TOKEN="$K3S_TOKEN" INSTALL_K3S_VERSION=$K3S_VERSION INSTALL_K3S_EXEC="$K3S_EXEC" /root/get-k3s.sh
    fi
    echo "fs.inotify.max_user_watches=2099999999" >> /etc/sysctl.d/10-ionotify.conf
    echo "fs.inotify.max_user_instances=2099999999" >> /etc/sysctl.d/10-ionotify.conf
    echo "fs.inotify.max_queued_events=2099999999" >> /etc/sysctl.d/10-ionotify.conf
fi

if [ "$INSTALL_ISCSI" == "true" ]; then
    # install open-iscsi and rebuild initramfs
    echo "Installing iSCSI initiator"
    apt-get install -y open-iscsi initramfs-tools

    touch /etc/iscsi/iscsi.initramfs

    if [ "$TARGET_PLATFORM" == "rpi" ]; then
        kernel_version=$(dd if=/boot/kernel8.img 2>/dev/null | gunzip | strings | grep "Linux version" | awk '{print $3}' | head -n 1)
        echo "Detected kernel version: $kernel_version"
        echo "CONFIG_RD_ZSTD=y" > /boot/config-$kernel_version
        mkinitramfs -o /boot/initramfs8 $kernel_version
    else
        update-initramfs -u
    fi
fi

if [ "$INSTALL_DYNHOSTNAME" == "true" ]; then
    echo "Installing dynamic hostname service"
    script_data="$(cat <<-EOF
#!/bin/bash
set -e
# Find the first ethernet network interface
interface=\$(
    for iface_path in /sys/class/net/*; do
        iface=\$(basename "\$iface_path")
        case "\$iface" in
            eth*|en*) ;;
            *) continue ;;
        esac
        echo "\$iface"
        break
    done
)
echo "Using network interface: \$interface"
mac_addr=\$(cat /sys/class/net/\$interface/address 2>/dev/null || echo "00:00:00:00:00:00")
short_mac=\$(echo \$mac_addr | tr -d ':' | cut -c7-12)
new_hostname="k3s-\$short_mac"
echo "Setting new hostname to \$new_hostname"
echo "\$new_hostname" > /etc/hostname
hostname "\$new_hostname"
EOF
)"
    echo "$script_data" > /usr/local/bin/dynhostname
    chmod +x /usr/local/bin/dynhostname

    service_data="$(cat <<-EOF
[Unit]
Description=Set dynamic hostname based on MAC address
Wants=network-pre.target
Before=network-pre.target

[Service]
ExecStart=/usr/local/bin/dynhostname
Type=oneshot

[Install]
WantedBy=multi-user.target
EOF
)"
    echo "$service_data" > /etc/systemd/system/dynhostname.service
    systemctl enable dynhostname.service
fi

if [ "$INSTALL_CLOUD_INIT" == "true" ]; then
    echo "Configuring cloud-init"
    apt-get install -y --no-install-recommends cloud-init cloud-guest-utils cloud-utils
fi

if [ "$TARGET_PLATFORM" == "rpi" ]; then
    echo "Configuring Raspberry Pi specific settings"
    systemctl disable userconfig.service
fi

# configure networking
if [ "$TARGET_PLATFORM" != "rpi" ]; then
    echo "Configuring networking"
    apt-get install -y --no-install-recommends netplan.io systemd-resolved libnss-resolve libnss-myhostname systemd-timesyncd
    apt-get remove -y --purge ifupdown
    rm -rf /etc/network/interfaces.d
    systemctl enable systemd-networkd.service
    systemctl enable systemd-resolved.service
fi

if [ "$INSTALL_CLOUD_INIT" == "true" ]; then
    rm -rf /etc/netplan/* # cloud-init will handle netplan configs, so remove any existing files
fi

echo "Installation complete"
This is a simple script to do the initial installation of packages and configuration for all build images.
The config options are the following:
INSTALL_CLOUD_INIT: if set to true, will install and configure the cloud-init packages, in my case this is only used to build images for proxmox, so it will not be used here
INSTALL_K3S is used to install the K3S agent or server.
If K3S_URL (the url to the master node) and K3S_TOKEN (the join token) are provided, the scripts configures k3s as an agent, else, it is configured as a server.
If TARGET_PLATFORM=rpi is set, the taint cli arg will also be added: --node-taint droso/target-type=lowpower:NoSchedule.
We also increase the fs.inotify limits by writing a config file in /etc/sysctl.d/10-ionotify.conf since the defaults are not sufficient when running a lot of containers.
INSTALL_DYNHOSTNAME is used to add a script to set the hostname of the device at boot.
The script is executed as a network-pre.target systemd service, it lists the ethernet network interfaces and uses a short form of the mac address of the first insterface as the hostname.
This is required as k8s requires a unique hostname for each node (but our images are generic and used by multiple nodes).
INSTALL_ISCSI is used to install the ISCSI initiator. This is the most important part as this is the software used at startup to mount the ISCSI share at the root of filesystem (effectively, replacing the need for a local drive). Here, we’ll be using open-iscsi.
The debian package supports booting on an ISCSI drive, to enable it we need to create a /etc/iscsi/iscsi.initramfs file. Options such as the initiator iqn can be set in this file, but to keep this image generic, we’ll use the second option which is to provide these option directly as cmdline when booting.
We then need to rebuild the initramfs:
- On the x64 version, is as easy as running
update-initramfs -u - On the raspberry version, this doesn’t work (at least in the packer builder), so we need to manually find the kernel version with this beautiful command
kernel_version=$(dd if=/boot/kernel8.img 2>/dev/null | gunzip | strings | grep "Linux version" | awk '{print $3}' | head -n 1)and runmkinitramfs -o /boot/initramfs8 $kernel_version.
Configuring the iSCSI server
Now that we have build generic disk images for both raspberry and x64 devices, we need to configure the ISCSI server to serve these images.
There are multiple implementations of iscsi servers (also called targets) available on linux. Here, we’ll be using the in-kernel implementation. To manage its configuration, we’ll need to install targetcli-fb.
First, we need to create the backstores which are the actual storage spaces. You can of couse use block devices (such as physical disks or partitions), but here what’s really interesting is the fileio backstore that enables you to use a disk image file as a storage medium:
- Open the interactive cli with
targetcli - Go to backstores:
cd /backstores/fileio - Create a new backstore:
create rpi3b /srv/iscsi/nvme1/pxe/rpi3b.img 32G
I created two backstores, one for my raspberry of 32gb at the path /srv/iscsi/nvme1/pxe/rpi3b.img and one for my dell micro-pc of 64gb at /srv/iscsi/nvme1/pxe/srvdell.img (I allocated more space to the dell pc because since it way more powerful than the raspberry, it will receive more pods and thus require more storage for the container images).
The disk images don’t actually need to exist yet, just ensure that the size that you define in the backstore corresponds to the actual size that you want your img file to be (for example if you have a disk image of 64gb but the backstore is only defined for 32gb, only the 32gb will be accessible when mounting the drive over iscsi).
You can now define the portal and targets.
An ISCSI target is defined by its iqn (iSCSI Qualified Name): this is a unique identifier for a machine (so both our clients and our server should have at least one iqn). We can then assing them ACLs to access our LUNs (Logical Unit Number: the virtual disks). The iqn should be formatted as follows: iqn.yyyy-mm.domain:name with “yyyy-mm” the date of acquisition of the domain, “domain” the reverse domain name, and “name” any unique name. For example, I’m using the following iqn format for my devices: iqn.2023-06.tld.mydomain.pxe:macaddress_of_the_device and the following iqn for my server: iqn.2023-06.tld.mydomain.myserver:nvme1.pxe.
Let’s create the iqn for our server:
cd /iscsicreate iqn.2023-06.tld.mydomain.myserver:nvme1.pxe
Now let’s add some LUNs to this iqn:
- Go to LUNs:
cd iqn.2023-06.tld.mydomain.myserver:nvme1.pxe/tpg1/luns - For each device, create a new LUN referencing its backstore:
create /backstores/fileio/rpi3b - Go to ACLs:
cd ../acls - Create the IQN of the clients:
create iqn.2023-06.tld.mydomain.pxe:aa-aa-aa-aa-aa-aa - And for each of these IQNs, assign a username/password for authentication:
cd iqn.2023-06.tld.mydomain.pxe:aa-aa-aa-aa-aa-aa,set auth userid=myuser,set auth password=mysuperpass
Finally, ensure that you have at least one portal configured and that it listens on the correct IP/Port for our initators to connect to:
cd /iscsi/iqn.2023-06.tld.mydomain.myserver:nvme1.pxe/tpg1/portalscreate 0.0.0.0 3260
Don’t forget to save your config before exiting:
saveconfigexit
Here is an example output of targetcli ls after finishing the configuration:
/> ls
o- / ............................................................................................................. [...]
  o- backstores .................................................................................................. [...]
  | o- fileio ..................................................................................... [Storage Objects: 2]
  | | o- lun_rpi3b ..................................... [/srv/iscsi/nvme1/pxe/rpi3b.img (32.0GiB) write-back activated]
  | | | o- alua ....................................................................................... [ALUA Groups: 1]
  | | |   o- default_tg_pt_gp ........................................................... [ALUA state: Active/optimized]
  | | o- lun_srv_dell ................................ [/srv/iscsi/nvme1/pxe/srvdell.img (64.0GiB) write-back activated]
  | |   o- alua ....................................................................................... [ALUA Groups: 1]
  | |     o- default_tg_pt_gp ........................................................... [ALUA state: Active/optimized]
  | o- pscsi ...................................................................................... [Storage Objects: 0]
  | o- ramdisk .................................................................................... [Storage Objects: 0]
  o- iscsi ................................................................................................ [Targets: 2]
  | o- iqn.2023-06.tld.mydomain.myserver:nvme1.pxe ........................................................... [TPGs: 1]
  |   o- tpg1 ................................................................................... [no-gen-acls, no-auth]
  |     o- acls .............................................................................................. [ACLs: 2]
  |     | o- iqn.2023-06.tld.mydomain.pxe:aa-aa-aa-aa-aa-aa ........................................... [Mapped LUNs: 1]
  |     | | o- mapped_lun0 ................................................................ [lun1 fileio/lun_rpi3b (rw)]
  |     | o- iqn.2023-06.tld.mydomain.pxe:bb-bb-bb-bb-bb-bb ........................................... [Mapped LUNs: 1]
  |     |   o- mapped_lun0 ............................................................. [lun0 fileio/lun_srv_dell (rw)]
  |     o- luns .............................................................................................. [LUNs: 2]
  |     | o- lun0 .......................... [fileio/lun_srv_dell (/srv/iscsi/nvme1/pxe/srvdell.img) (default_tg_pt_gp)]
  |     | o- lun1 ............................... [fileio/lun_rpi3b (/srv/iscsi/nvme1/pxe/rpi3b.img) (default_tg_pt_gp)]
  |     o- portals ........................................................................................ [Portals: 1]
  |       o- 0.0.0.0:3260 ......................................................................................... [OK]
  o- loopback ............................................................................................. [Targets: 0]
  o- srpt ................................................................................................. [Targets: 0]
  o- vhost ................................................................................................ [Targets: 0]
  o- xen-pvscsi ........................................................................................... [Targets: 0]
/>
To make things easier, instead of configuring everything manually, I’m using Ansible and a pxe.yaml configuration file to define my options for each device.
I was using the ricsanfre/ansible-role-iscsi_target role, but ended up forking it here: drosoCode/ansible-role-iscsi_target to add missing configuration option (especially regarding the fileio storage size). To use the forked version, add this in your ansible’s requirements.yaml:
roles:
  - name: ricsanfre.iscsi_target
    src: https://github.com/drosoCode/ansible-role-iscsi_target
    version: master
You can find the playbook and pxe config below.
- hosts: kirito
  name: "Setup iSCSI Target for PXE Boot"
  become: true
  gather_facts: true
  vars:
    pxe_config: "{{ lookup('file', '../../../settings/pxe.yaml') | from_yaml }}"
    pxe_base_iscsi_path: "{{ pxe_iscsi_path }}"
    iscsi_targets:
      - name: "{{ pxe_config.iscsi_target.iqn }}"
        disks: >-
          {%- set disks = [] -%}
          {%- for pxe_item in pxe_config.pxe -%}
          {%- set disk = {
              'name': 'lun_' + pxe_item.name,
              'path': pxe_base_iscsi_path + pxe_item.iscsi_target_path,
              'size': pxe_item.image_size_gb|string + 'G',
              'type': 'fileio',
              'lunid': loop.index0
          } -%}
          {%- set _ = disks.append(disk) -%}
          {%- endfor -%}
          {{ disks }}
        initiators: >-
          {%- set initiators = [] -%}
          {%- for pxe_item in pxe_config.pxe -%}
          {%- set initiator = {
              'name': pxe_item.iscsi_initiator_iqn,
              'authentication': {
                'userid': pxe_config.iscsi_target.username,
                'password': pxe_config.iscsi_target.password
              },
              'mapped_luns': [{
                'mapped_lunid': 0,
                'lunid': loop.index0
              }]
          } -%}
          {%- set _ = initiators.append(initiator) -%}
          {%- endfor -%}
          {{ initiators }}
        portals:
          - ip: "0.0.0.0"
            port: 3260

  roles:
    - role: ricsanfre.iscsi_target
# PXE configuration file
# this is a common file used by:
# - the pxe script to prepare the iSCSI and tftp file trees (and patch the rpi cmdlines)
# - the ansible playbook to deploy the iSCSI disk images and tftp files
# - the ansible playbook to setup the iSCSI targets on the server
iscsi_target:
ip: "storage_server_ip"
port: 3260
iqn: iqn.2023-06.tld.domain.storage_server_name:nvme1.pxe
username: <username>
password: <password>
# base_iscsi_target_path: /srv/iscsi/nvme1/pxe/
ipxe:
iscsi_initiator_iqn: "iqn.2023-06.tld.domain.pxe:${mac:hexhyp}" # the ${mac:hexhyp} variable only works with iPXE
boot_config:
k3s:
initrd_path: initrd.img # path inside the disk image (to extract from)
kernel_path: vmlinuz
source_image_path: qemu_amd64_uefi/debian # path on the building machine, relative to the "src_img_path" supplied to the script
tftp_dir: k3s # subdirectory in the tftp root where to place the boot files
# there are two types of supported boot types:
# - ipxe: standard iPXE boot, used by x86_64 and similar architectures
# - requires a ipxe_boot_config option to select the correct ipxe boot config to use (to get the kernel/initrd and ipxe bootloader)
# - requires the iscsi_initiator_iqn to be set to a fixed value (as ansible can't know the MAC address in advance)
# - rpi: Raspberry Pi network boot, which uses its own firmware and
# - requires the iscsi_initiator_iqn to be set to a fixed value (cannot use ${mac:hexhyp})
# - requires the source_image_path to point to the base disk image to use
# - requires the serial_number of the rpi (grep Serial /proc/cpuinfo) (used to set the tftp_dir)
pxe:
- name: srv_dell
iscsi_target_path: srvdell.img # path of the disk image on the target server (relative to the target pxe mount point)
boot_type: ipxe
ipxe_boot_config: k3s
iscsi_initiator_iqn: "iqn.2023-06.tld.domain.pxe:aa-aa-aa-aa-aa-aa"
image_size_gb: 32 # default size of the disk image to expand to
- name: rpi3b
iscsi_target_path: rpi3b.img
boot_type: rpi
iscsi_initiator_iqn: "iqn.2023-06.tld.domain.pxe:bb-bb-bb-bb-bb-bb"
source_image_path: rpi_arm64.img
serial_number: xxxxxxxxx
image_size_gb: 32Extracting and customizing the images
To customize our disk images and upload them to the right location, we’ll continue to use the pxe.yaml config file created above to centralize the pxe configuration (since there are many moving parts).
But why do we need to “customize” the images ?
At this point, we’ve built a generic disk image for amd64 and RPI devices. But to actually make them boot we need to tell the BIOS how to boot these disk images and how to mount the root partition. To do this, we need to extract some files from the build images and customize them.
I’m using the following python script to automate these steps, but I will detail the manual process below.
#!python3

import shutil
import yaml
import os
import subprocess

MOUNT_POINT = "/mnt/packer_data_tmp"

def mount_image(src_img_path, partition):
    if not os.path.exists(MOUNT_POINT):
        os.makedirs(MOUNT_POINT)

    loop_dev = subprocess.run(["losetup", "-f", "--show", "-P", src_img_path], stdout=subprocess.PIPE, check=True)
    loop_dev_path = loop_dev.stdout.decode().strip()
    subprocess.run(["mount", f"{loop_dev_path}p{partition}", MOUNT_POINT], check=True)
    return loop_dev_path

def unmount_image(loop_dev_path):
    subprocess.run(["umount", MOUNT_POINT], check=True)
    subprocess.run(["losetup", "-d", loop_dev_path], check=True)

def expand_image(img_path, size_mb):
    if not os.path.exists(img_path):
        raise FileNotFoundError(f"Image not found: {img_path}")
    if not os.path.isfile(img_path):
        raise ValueError(f"Image is not a file: {img_path}")

    # Create a sparse file of the desired size
    subprocess.run(["dd", "if=/dev/zero", f"of={img_path}", "bs=1M", "count=0", f"seek={size_mb}"], check=True)

    loop_dev = subprocess.run(["losetup", "-f", "--show", "-P", img_path], stdout=subprocess.PIPE, check=True)
    loop_dev_path = loop_dev.stdout.decode().strip()

    # Move GPT backup header to end of disk if required
    parted_output = subprocess.run(["parted", loop_dev_path, "--script", "print"], stdout=subprocess.PIPE, stderr=subprocess.PIPE, check=True)
    is_gpt = "gpt" in parted_output.stdout.decode().lower()
    if is_gpt:
        subprocess.run(["sgdisk", "-e", loop_dev_path], check=True)

    # Resize partition 2 to fill the disk
    subprocess.run(["parted", loop_dev_path, "--script", "resizepart 2 100%"], check=True)

    # Resize filesystem on partition 2
    subprocess.run(["fsck", "-f", f"{loop_dev_path}p2"], check=True)
    subprocess.run(["resize2fs", f"{loop_dev_path}p2"], check=True)
    subprocess.run(["fsck", "-f", f"{loop_dev_path}p2"], check=True)

    subprocess.run(["losetup", "-d", loop_dev_path], check=True)


class PXEDispatcher:
    def __init__(self, config_path, src_img_path, output_path):
        self.script_root = os.getcwd()
        self.src_img_path = src_img_path

        self.tftp_dir = os.path.join(output_path, "tftp")
        self.iscsi_dir = os.path.join(output_path, "iscsi")

        if os.path.exists(output_path):
            shutil.rmtree(output_path)
        os.makedirs(self.tftp_dir)
        os.makedirs(self.iscsi_dir)

        with open(config_path, 'r') as f:
            self.cfg = yaml.safe_load(f)

        self.target_iscsi_args = f"ISCSI_TARGET_NAME={self.cfg['iscsi_target']['iqn']} ISCSI_TARGET_IP={self.cfg['iscsi_target']['ip']} ISCSI_TARGET_PORT={self.cfg['iscsi_target']['port']} ISCSI_AUTHMETHOD=CHAP ISCSI_USER={self.cfg['iscsi_target']['username']} ISCSI_PW={self.cfg['iscsi_target']['password']}"

        subprocess.run(["docker", "build", "-t", "ipxe_builder", "."], cwd=self.script_root, check=True)


    def build_ipxe_efi(self, tftp_dir, dst_path):
        tmp_dir = os.path.join(self.script_root, "tmp_ipxe_build")
        if os.path.exists(tmp_dir):
            shutil.rmtree(tmp_dir)
        os.makedirs(tmp_dir)

        tftp_dir = tftp_dir.strip("/")
        if tftp_dir != "":
            tftp_dir += "/"

        with open(os.path.join(tmp_dir, "boot.ipxe"), 'w') as f:
            f.write("#!ipxe\n")
            f.write("dhcp\n")
            f.write(f"kernel {tftp_dir}vmlinuz root=/dev/sda2 ro quiet ip=dhcp ISCSI_INITIATOR={self.cfg['ipxe']['iscsi_initiator_iqn']} {self.target_iscsi_args}\n")
            f.write(f"initrd {tftp_dir}initrd.img\n")
            f.write("boot\n")

        build_cmd = [
            "docker", "run", "-it", "--rm",
            "-v", f"{tmp_dir}:/data",
            "ipxe_builder"
        ]
        subprocess.run(build_cmd, check=True)

        shutil.move(os.path.join(tmp_dir, "ipxe.efi"), dst_path)
        shutil.rmtree(tmp_dir)


    def process_ipxe_config(self, boot_config, matching_pxe_entries):
        tftp_dir = os.path.join(self.tftp_dir, boot_config["tftp_dir"])
        os.makedirs(tftp_dir, exist_ok=True)

        src_img = os.path.join(self.src_img_path, boot_config["source_image_path"])
        if not os.path.exists(src_img):
            raise FileNotFoundError(f"Source image not found: {src_img}")

        # extract boot file from source image
        loopdev = mount_image(src_img, "2")
        shutil.copy(os.path.join(MOUNT_POINT, boot_config["initrd_path"]), os.path.join(tftp_dir, "initrd.img"))
        shutil.copy(os.path.join(MOUNT_POINT, boot_config["kernel_path"]), os.path.join(tftp_dir, "vmlinuz"))
        unmount_image(loopdev)

        # copy ipxe bootloader
        self.build_ipxe_efi(boot_config["tftp_dir"], os.path.join(tftp_dir, "ipxe.efi"))

        # add disk image for each initiator
        for pxe in matching_pxe_entries:
            dst = os.path.join(self.iscsi_dir, pxe["iscsi_target_path"])
            shutil.copy(src_img, dst)
            expand_image(dst, pxe["image_size_gb"] * 1024)


    def process_rpi_entry(self, pxe_entry):
        tftp_dir = os.path.join(self.tftp_dir, pxe_entry["serial_number"])
        os.makedirs(tftp_dir, exist_ok=True)

        src_img = os.path.join(self.src_img_path, pxe_entry["source_image_path"])
        if not os.path.exists(src_img):
            raise FileNotFoundError(f"Source image not found: {src_img}")

        # extract boot files from source image
        loopdev = mount_image(src_img, "1")
        subprocess.run(["rsync", "-avhP", f"{MOUNT_POINT}/", tftp_dir], check=True)
        unmount_image(loopdev)

        # copy bootcode.bin if missing
        bootcode_dst = os.path.join(self.tftp_dir, "bootcode.bin")
        if not os.path.exists(bootcode_dst):
            shutil.copy(os.path.join(tftp_dir, "bootcode.bin"), bootcode_dst)

        # patch cmdline.txt and config.txt
        # cgroup_enable=cpuset cgroup_memory=1 cgroup_enable=memory are required for k3s
        cmdline = "console=serial0,115200 console=tty1 ip=dhcp root=/dev/sda2 rootfstype=ext4 elevator=deadline cgroup_enable=cpuset cgroup_memory=1 cgroup_enable=memory rootwait rw "
        iscsi_params = f"ISCSI_INITIATOR={pxe_entry['iscsi_initiator_iqn']} {self.target_iscsi_args}"

        cmdline_path = os.path.join(tftp_dir, "cmdline.txt")
        with open(cmdline_path, 'w+') as f:
            f.write(cmdline + iscsi_params + "\n")

        # The 2712 suffix is for Raspberry Pi 5, while v8 is for all previous generations
        config_path = os.path.join(tftp_dir, "config.txt")
        with open(config_path, 'a') as f:
            f.write("\n")
            f.write("kernel=kernel8.img\n")
            f.write("initramfs initramfs8 followkernel\n")

        # add disk image for each initiator
        dst = os.path.join(self.iscsi_dir, pxe_entry["iscsi_target_path"])
        shutil.copy(src_img, dst)
        expand_image(dst, pxe_entry["image_size_gb"] * 1024)

    def run(self):
        matching_pxe_entries = {}

        for pxe_entry in self.cfg["pxe"]:
            if pxe_entry["boot_type"] == "rpi":
                self.process_rpi_entry(pxe_entry)
            elif pxe_entry["boot_type"] == "ipxe":
                matching_pxe_entries.setdefault(pxe_entry["ipxe_boot_config"], []).append(pxe_entry)
            else:
                raise ValueError(f"Unknown PXE boot_type: {pxe_entry['boot_type']}")

        for boot_config_name, entries in matching_pxe_entries.items():
            self.process_ipxe_config(self.cfg["ipxe"]["boot_config"][boot_config_name], entries)


if __name__ == "__main__":
    dispatcher = PXEDispatcher("../settings/pxe.yaml", "../packer/output", "./output")
    dispatcher.run()
Note that for this step, you will have to already have configured an iSCSI target (previous step) and a TFTP server (a tftp package is usually available if you have a decent router).
For amd64 devices
The legacy “PXE” booting doesn’t allow to directly boot from a disk image on an iSCSI server, so we’ll first need to boot into a more featureful bootloader such as iPXE. This is called chainloading, depending on your network card firmware you may not need to do this (since some of them already supports iPXE out of the box).
iPXE then allows you to write scripts to control the boot process.
There are two ways to use these scripts:
- You can pass the URL of the script to iPXE directly and it will fetch and execute it at runtime (ex
http://192.168.0.1/boot.php?mac=${net0/mac}&asset=${asset:uristring}) - Or you can embed the script directly in the iPXE binary
I’ve selected the second option (since it’s required anyways to build iPXE if you want the chainloadable PXE binary), but I strongly suggest you to use the first method if your network card firmware already supports iPXE.
In theory, you can use the sanboot command to directly boot from an iSCSI disk, but I haven’t been able to make it work, so we’ll use a little workaround:
- We’ll extract the kernel and initrd from our generic amd64 disk image and upload them to the TFTP server (along with the iPXE binary)
- The legacy-PXE will boot the iPXE binary fetched from the TFTP server (the bootfile is specified in the dhcp responses)
- Once loaded, the iPXE binary will fetch the kernel (and initrd) from the TFTP server and start it
- The kernel will start the iscsi initiator (
open-iscsiinstalled in the previous steps) and this initiator will use some arguments in the kernel cmdline to mount the iSCSI disk as the root partition
The required kernel cmdline args for open-iscsi are:
ISCSI_INITIATOR: the IQN to use for this device, with iPXE we can use the${mac:hexhyp}substitution to use the mac address of the network card used to boot. (ex:iqn.2023-06.tld.domain.pxe:${mac:hexhyp})ISCSI_TARGET_NAME: the IQN of the iSCSI target (exiqn.2023-06.tld.domain.storage_server_name:nvme1.pxe)ISCSI_TARGET_IP: the IP address of the iSCSI targetISCSI_TARGET_PORT: the port of the iSCSI targetISCSI_AUTHMETHOD=CHAP: to use secure authenticationISCSI_USER: the username to use with the iSCSI targetISCSI_PW: the password to use with the iSCSI target
Out of all these parameters, the ISCSI_INITIATOR is the only one that changes dynamically (depending on the mac address of the machine that is booting).
Now here’s what our iPXE script looks like:
#!ipxe
dhcp
kernel k3s/vmlinuz root=/dev/sda2 ro quiet ip=dhcp ISCSI_INITIATOR=iqn.2023-06.tld.domain.pxe:${mac:hexhyp} ISCSI_TARGET_NAME=iqn.2023-06.tld.domain.storage_server_name:nvme1.pxe ISCSI_TARGET_IP=10.10.2.1 ISCSI_TARGET_PORT=3260 ISCSI_AUTHMETHOD=CHAP ISCSI_USER=user ISCSI_PW=password
initrd k3s/initrd.img
boot
* k3s/ is the directory that I’m using in the TFTP server to store the kernel and initrd
Then to build iPXE, we’ll use a docker container:
FROM debian:13-slim

RUN apt-get update && apt-get install -y build-essential git liblzma-dev && \
    git clone https://github.com/ipxe/ipxe.git /tmp/ipxe

CMD ["/bin/sh", "-c", "cd /tmp/ipxe/src && make bin-x86_64-efi/ipxe.efi EMBED=/data/boot.ipxe && cp /tmp/ipxe/src/bin-x86_64-efi/ipxe.efi /data/ipxe.efi"]

# warning: to load relative tftp paths (like boot/vmlinuz), the dhcp server MUST send "next-server ip" (the ip of the tftp server to use)- Name your script
boot.ipxe - Build the container with:
docker build -t ipxe_builder . - Create the iPXE binary with:
docker run -it --rm -v ./path/to/ipxe_script_dir:/data ipxe_builder
We now need to extract the kernel and initrd from our disk image.
In linux, it’s pretty easy: all we need to do is mount the image and copy the right files
- Create some folder to mount your disk to
mkdir /mnt/mountpoint - Add a loopback device pointing to your disk image
losetup -f --show -P /path/to/disk.img - Note the displayed path of your loopback device (ex:
/dev/loop0) - Mount the partition
mount /dev/loop0p2 /mnt/mountpoint: in this casep2means we’re mounting the second partition (this is the root partition, the first one being the EFI partition) - Copy the kernel
cp /mnt/mountpoint/vmlinuz /some/backup/path/ - Copy the initrd
cp /mnt/mountpoint/initrd.img /some/backup/path/ - Unmount the partition
umount /mnt/mountpoint - Remove the loopback device
losetup -d /dev/loop0
Now, copy the kernel, initrd and iPXE files to the TFTP server.
For Raspberry PIs
On the Rapsberry PI, the boot process is a bit different: the firwmare directly expects a predetermined file structure on the tftp server and will try to load only this one (see here).
This part is largely inspired from the blog post from warmestrobot, please check it out for more details on the differences between the RPi versions.
First, you need to boot from the sdcard (use any distribution as long as you have access to a terminal). Once connected to the PI:
- Run
vcgencmd otp_dump | grep 17, if the result is not1020000a, edit/boot/config.txtand setprogram_usb_boot_mode=1to enable the correct boot mode. Reboot and verify the result - Find the RPi serial number with
grep Serial /proc/cpuinfo(ignore the preceding zeros) - Find the RPi eth0 mac address with
ip a - That’s it for the on-device part
bootcode.bin (extracted from the image, see below) at the root and put (and keep it all the time) the SD Card in the RPi to work around some hardcoded bugs in the network boot.Now, let’s extract the boot files from our build image:
- Create some folder to mount your disk to
mkdir /mnt/mountpoint - Add a loopback device pointing to your disk image
losetup -f --show -P /path/to/disk.img - Note the displayed path of your loopback device (ex:
/dev/loop0) - Mount the partition
mount /dev/loop0p1 /mnt/mountpoint: in this casep1means we’re mounting the first partition - Copy the boot files
rsync -avhP /mnt/mountpoint/boot/ /some/backup/dir - Unmount the partition
umount /mnt/mountpoint - Remove the loopback device
losetup -d /dev/loop0
In the bootfiles destination folder (here /some/backup/dir), you will find a cmdline.txt file, edit it to look like this:
console=serial0,115200 console=tty1 ip=dhcp root=/dev/sda2 rootfstype=ext4 elevator=deadline cgroup_enable=cpuset cgroup_memory=1 cgroup_enable=memory rootwait rw ISCSI_INITIATOR=iqn.2023-06.tld.domain.pxe:bb-bb-bb-bb-bb-bb ISCSI_TARGET_NAME=iqn.2023-06.tld.domain.storage_server_name:nvme1.pxe ISCSI_TARGET_IP=10.10.2.1 ISCSI_TARGET_PORT=3260 ISCSI_AUTHMETHOD=CHAP ISCSI_USER=user ISCSI_PW=password
Customize the ISCSI_* parameters according the their description (see the amd64 section above). The only difference is that here, we need to specify the exact initiator value (so ${mac:hexhyp} can’t be used, we need to set a real unique value, here I’m still using the RPi mac address, but this config is now specific to each RPi device, this isn’t really a problem since the RPi will look for this file in a folder named after their serial number anyways).
Still in the same folder, edit the config.txt file and add at the end of the file:
kernel=kernel8.imginitramfs initramfs8 followkernel
kernel8 and initramfs8, use kernel2712 and initramfs2712Now copy rename your bootfiles destination folder to the serial number of the RPi and copy this folder to your TFTP server.
In this folder, you will also find the bootcode.bin, make sure to also copy this file to the root of the TFTP server as most RPi models will search for it at the root of the TFTP server.
Resizing and uploading the images
The TFTP server layout should now look like this (if using both RPi and amd64):
| /
|   /k3s
|     /k3s/vmlinuz
|     /k3s/initrd.img
|     /k3s/ipxe.efi
|   /bootcode.bin
|   /aabbccdd (<-- this is the RPi serial number)
|     /aabbccdd/config.txt
|     /aabbccdd/cmdline.txt
|     /aabbccdd/bootcode.bin
|     /aabbccdd/kernel8.img
|     /aabbccdd/initramfs8
|     /aabbccdd/<and a bunch of .dtb,.dat,.elf files ...>
Now the last step for storage is uploading the disk images to the iSCSI server.
The generic image that we have generated have a quite small disk size to be easier to manipulate, but we may want to resize them to be larger (especially when running a lot of containeres, k3s will use quite a lot of space), so let’s do this:
- Create sparse data at the end of your disk image:
dd if=/dev/zero of=/path/to/disk.img bs=1M count=0 seek=SIZE(replace SIZE by the actual size in megabytes, ex:32768for 32gb, it should be greater than the current image size) - Create a loopback device for the image:
losetup -f --show -P /path/to/disk.img - Note the displayed path of your loopback device (ex:
/dev/loop0) - Run:
parted /dev/loop0 --script printand check if the output containsgpt- If yes, move the gpt backup header to the end of the disk with
sgdisk -e /dev/loop0
- If yes, move the gpt backup header to the end of the disk with
- Now resize the data partition (here partition 2) to completely fill the end of the disk:
parted /dev/loop0 --script resizepart 2 100% - And resize the filesystem with (still partition 2 here):
fsck -f /dev/loop0p2resize2fs /dev/loop0p2fsck -f /dev/loop0p2
- Finally, remove the loopback device
losetup -d /dev/loop0
Now to upload the image to the server, we can use rsync with the --sparse --inplace options, this will ensure that rsync will only copy the actual data (and not the zeroed free space that we added) thus ensuring a much faster transfer speed.
I’ve created an ansible playbook to automate the task of uploading data to both the TFTP server and iSCSI server:
- hosts: pxe_servers
  name: "Upload PXE files to TFTP and iSCSI servers"
  become: true
  gather_facts: true
  vars:
    tftp_host: router_name
    iscsi_host: storage_server_name
    pxe_local_dir: "../../../pxe/output/"
    base_iscsi_path: "{{ pxe_iscsi_path }}"
    base_tftp_path: "/usr/local/tftp/"
  tasks:
    - name: Install rsync (apt)
      apt:
        name: rsync
        state: present
      when: inventory_hostname == iscsi_host

    - name: Install rsync (pkg)
      community.general.pkgng:
        name: rsync
        state: present
      when: inventory_hostname == tftp_host

    - name: Upload boot files to TFTP server
      ansible.posix.synchronize:
        src: "{{ pxe_local_dir + 'tftp/' }}"
        dest: "{{ base_tftp_path }}"
        archive: true
        recursive: true
        delay_updates: false
        delete: true
        partial: true
        rsync_opts:
          - "--sparse"
          - "--inplace"
      when: inventory_hostname == tftp_host

    - name: Upload disk image to iSCSI server
      ansible.posix.synchronize:
        src: "{{ pxe_local_dir + 'iscsi/' }}"
        dest: "{{ base_iscsi_path }}"
        archive: true
        recursive: true
        delay_updates: false
        delete: true
        partial: true
        rsync_opts:
          - "--sparse"
          - "--inplace"
      when: inventory_hostname == iscsi_host
Configuring the DHCP server
You’re almost there !
The last step is now to configure your DHCP server to tell our devices where to find their bootfiles on the TFTP server.
The client usually sends the following information with their DHCPDISCOVER and DHCPREQUEST requests:
- Vendor-Class Identifier (Option 60): the vendor class identifier
- “PXEClient:Arch:00000” for the Raspberry PI (but not limited to it)
- “PXEClient:Arch:00007” for UEFI x64 firmwares
- User Class Information (Option 77) for iPXE
- UUID/GUID-based Client Identifier
The following options/fields are expected in the DHCPOFFER and DHCPACK responses to make the network boot work:
- TFTP Server Name (Option 66): the IP of the TFTP server that will be used to load the bootfile (used by both RPi and amd64)
- Bootfile Name (Option 67): the path (on the TFTP server) of the boot file to fetch and load (only used for the amd64 boot)
- Next-Server: (or
siaddr) a field in the DHCP packet. For iPXE, we will also need to set the it to the IP of the TFTP server to use to load the kernel/initramfs (so only required for amd64 boot) - Vendor-specific Information (Option 43): set to “Raspberry Pi Boot” (only required for the RPi boot)
On dnsmasq, you can add rules (for example using the values provided in the DHCPDISCOVER requests) to limit the reach of these options (not the actual syntax):
- if “vendor-class id == PXEClient:Arch:00007” set “bootfile_name = k3s/ipxe.efi”
- if “client mac_address == xxxxxxxx” set “vendor-specific info = Raspberry Pi Boot”
On OPNsense, you can configure this in Services > Dnsmasq DNS & DHCP > DHCP Options. If you don’t have any other devices that requires Vendor-specific Information, it’s also fine to leave everything set all the time.
Overview
The network boot part of this series is finally finished (and it took wayy more time to write than I initially expected). You can now start your amd64 and/or RPi and after a few minutes it should (hopefully) join your cluster !
In case it’s not working, I’m adding below a few explanations of how the boot process worked in my case.
To debug PXE boot issues, the best way to be able to capture the network traffic (especially the DHCP packets), if using OPNsense you can do this with the following command: ssh root@10.10.1.1 'tcpdump -U -i mlxen1_vlan10 -w -' | sudo wireshark -k -S -i - (mlxen1_vlan10 here is my network interface mlxen1 with only the vlan 10 and 10.10.1.1 is my router ip. make sure to add your ssh key to it beforehand with ssh-copy-id root@10.10.1.1).
amd64 Boot
Here is the expected process for a amd64 boot (this diagram only focuses on the boot part, thus some parts are intentionally omitted or simplified).
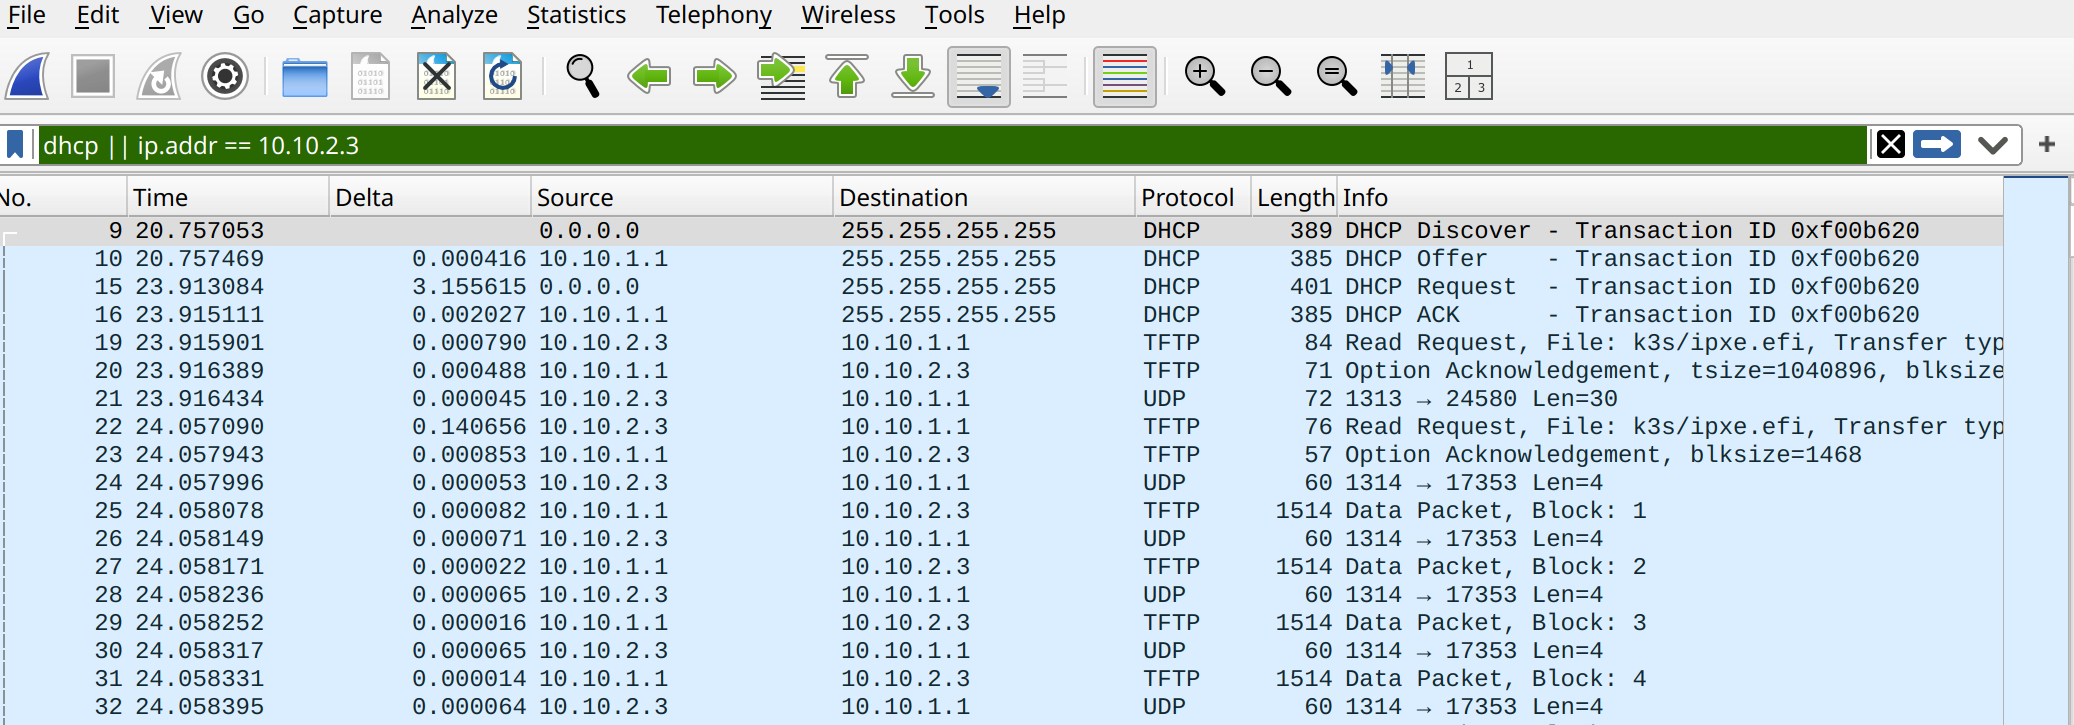
In Wireshark, this translates to this (with the following filter: dhcp || ip.addr == 10.10.2.3, 10.10.2.3 being the IP of my amd64 device):
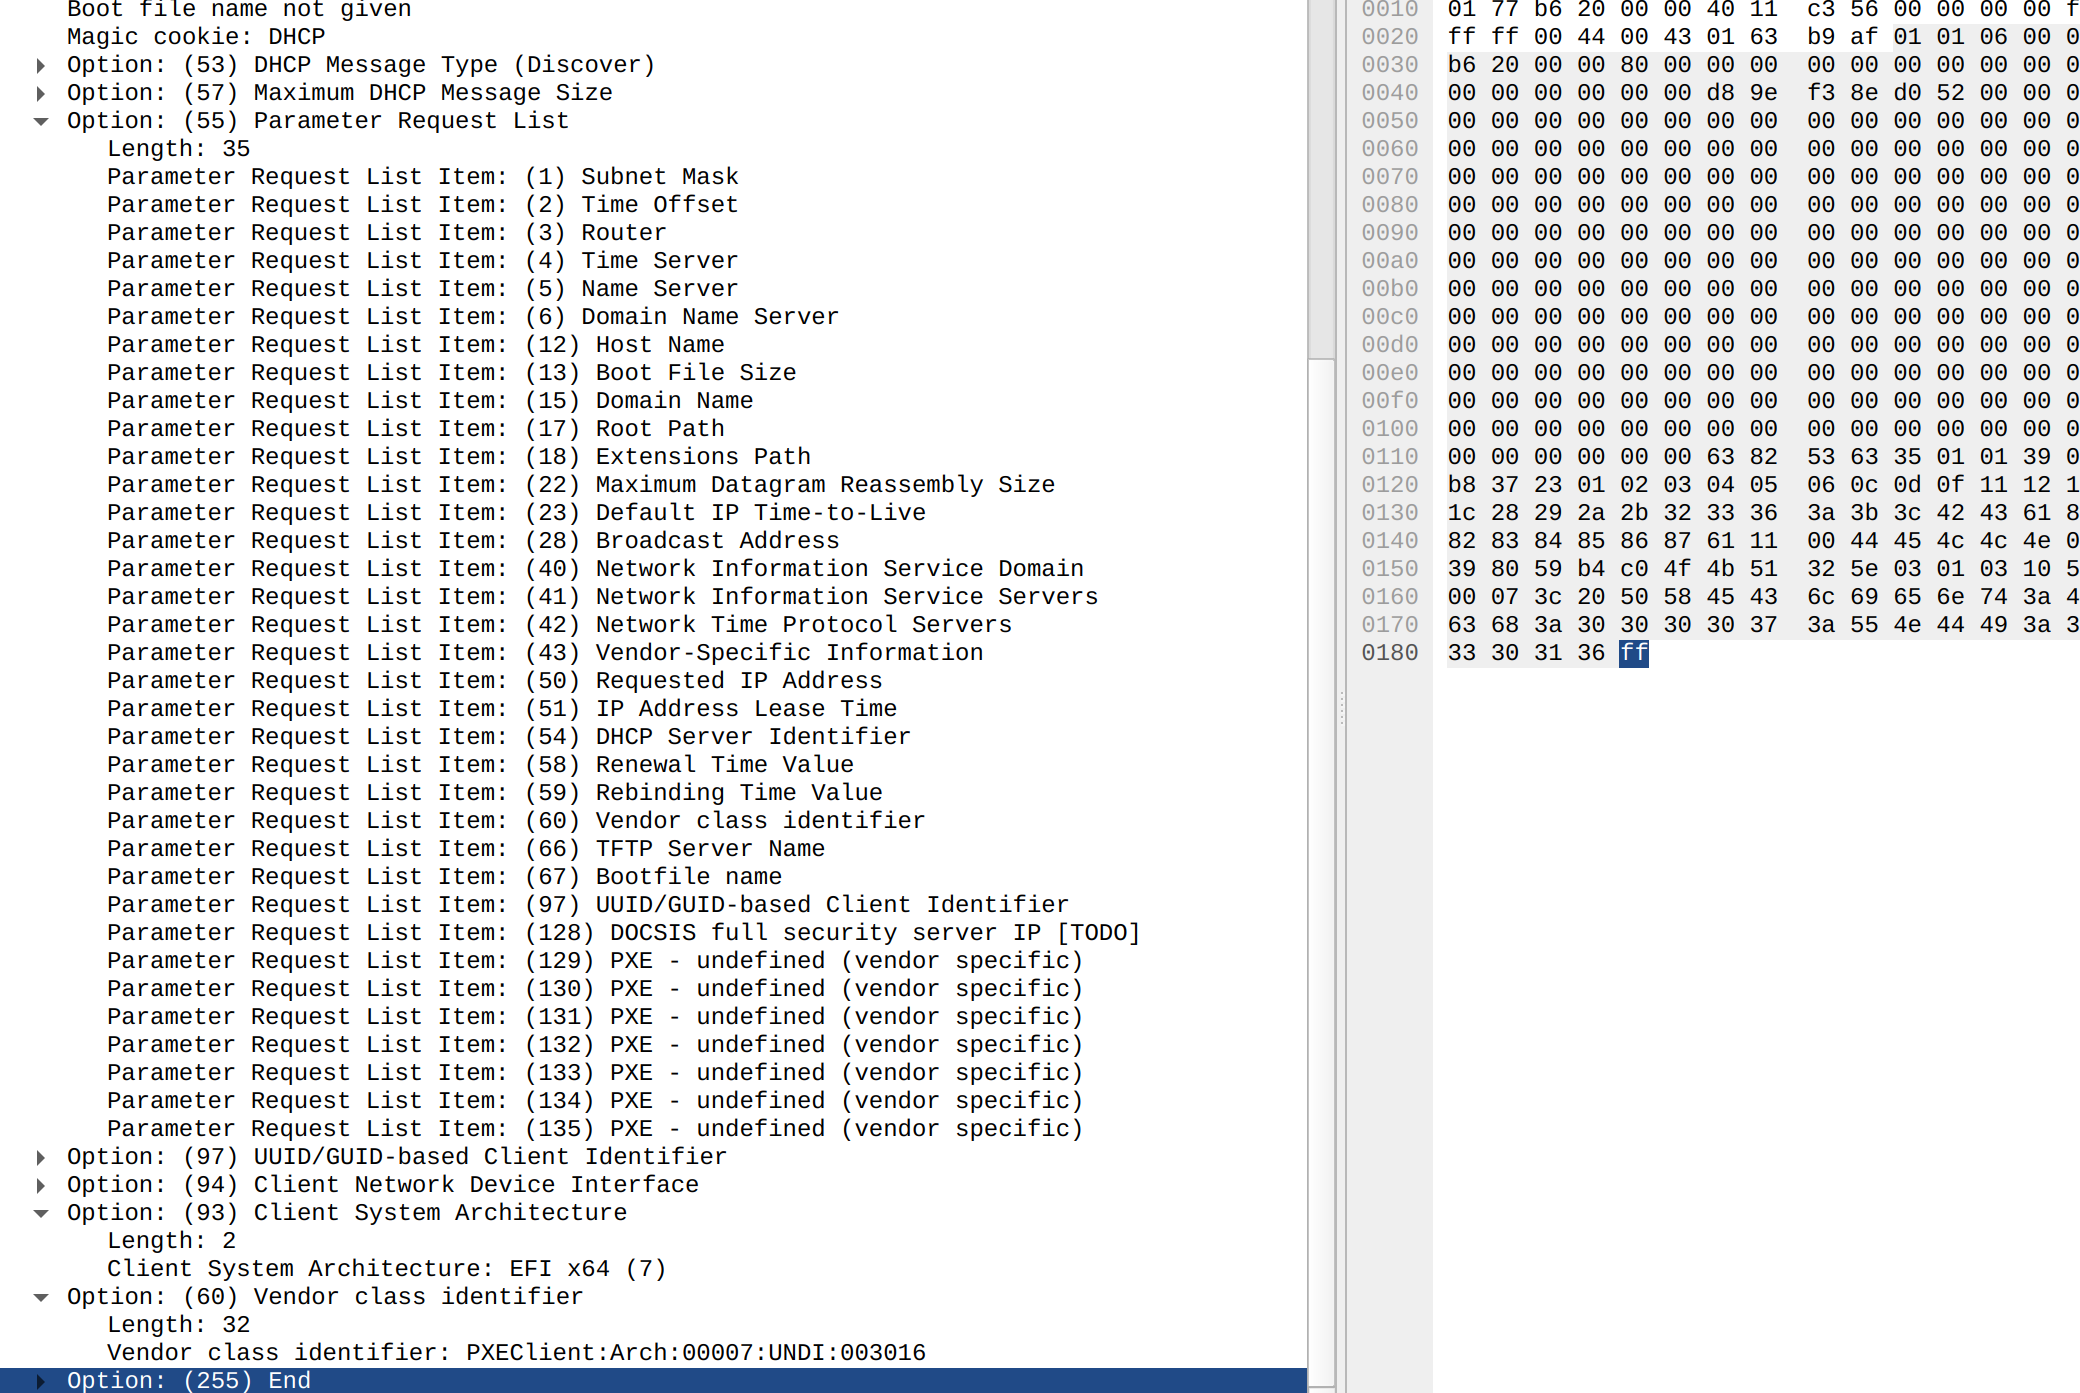
Below, you can clearly see the DHCPDISCOVER request sent by our device that includes a Vendor-Class ID of PXEClient:Arch:00007:UNDI:003016 and that requests the Bootfile Name and TFTP server options.
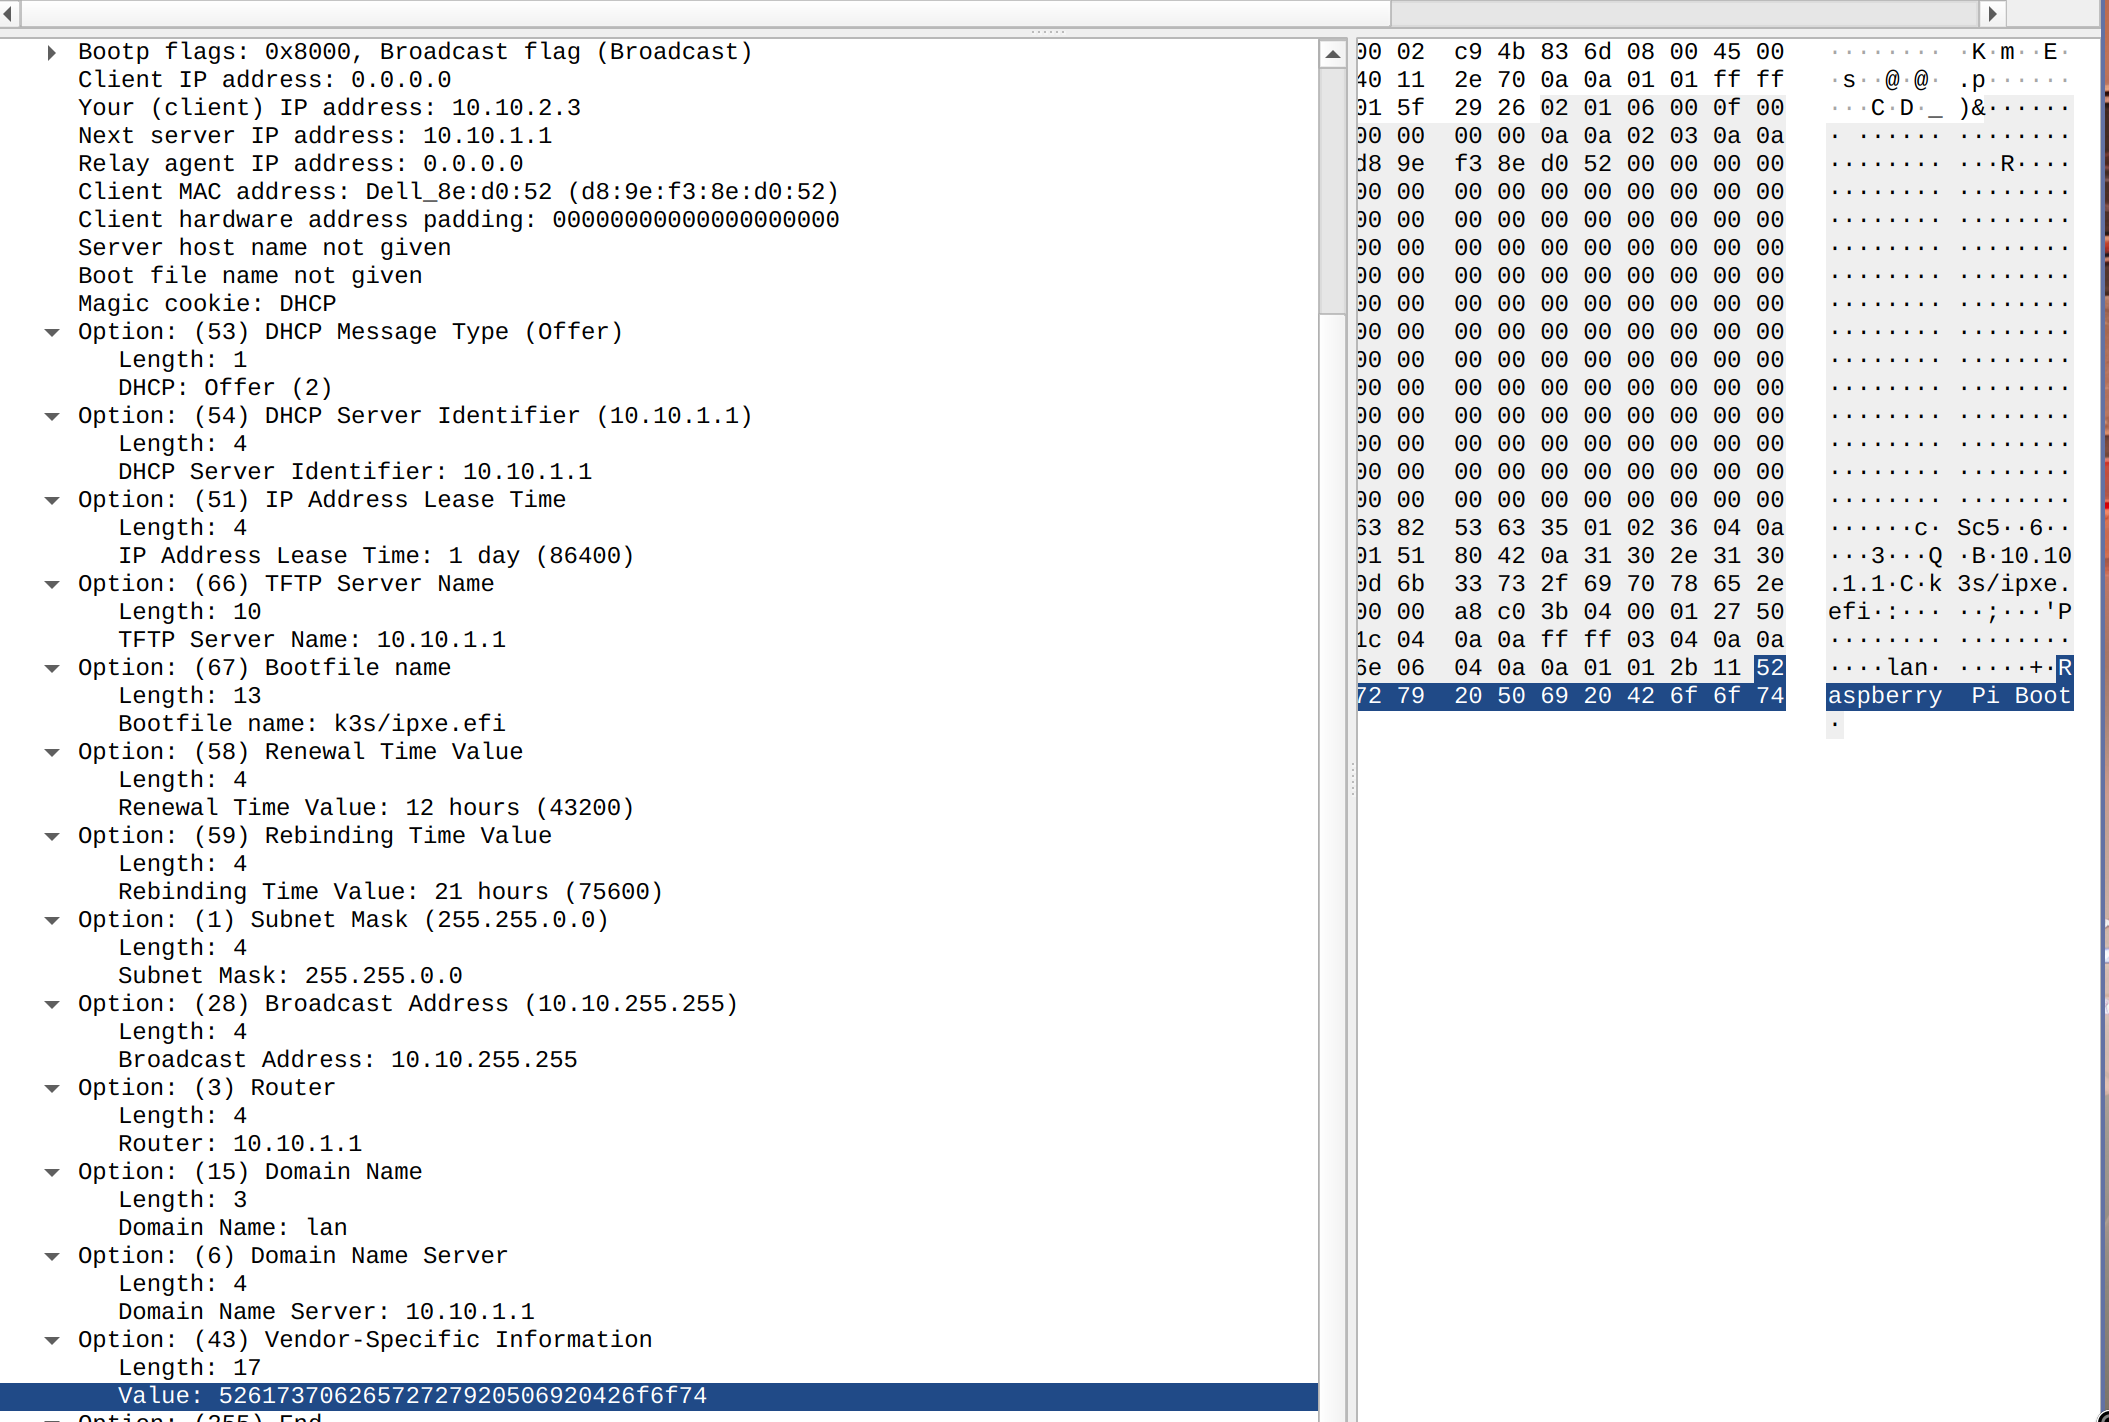
The DHCP server responds with a DHCPOFFER with the following values:
Bootfile Name: k3s/ipxe.efiTFTP Server Name: 10.10.1.1Next Server IP Address: 10.10.1.1 (this value is not used in the first DHCP request but is used by iPXE when doing the second DHCP request)- You can of course also find the usual DHCP values like “client IP address”, “router”, “subnet mask”, “domain name server” …
- Here the DHCP server always responds with
Vendor-Specific Informationset to “Raspberry Pi Boot” but this value is not used for the amd64 boot
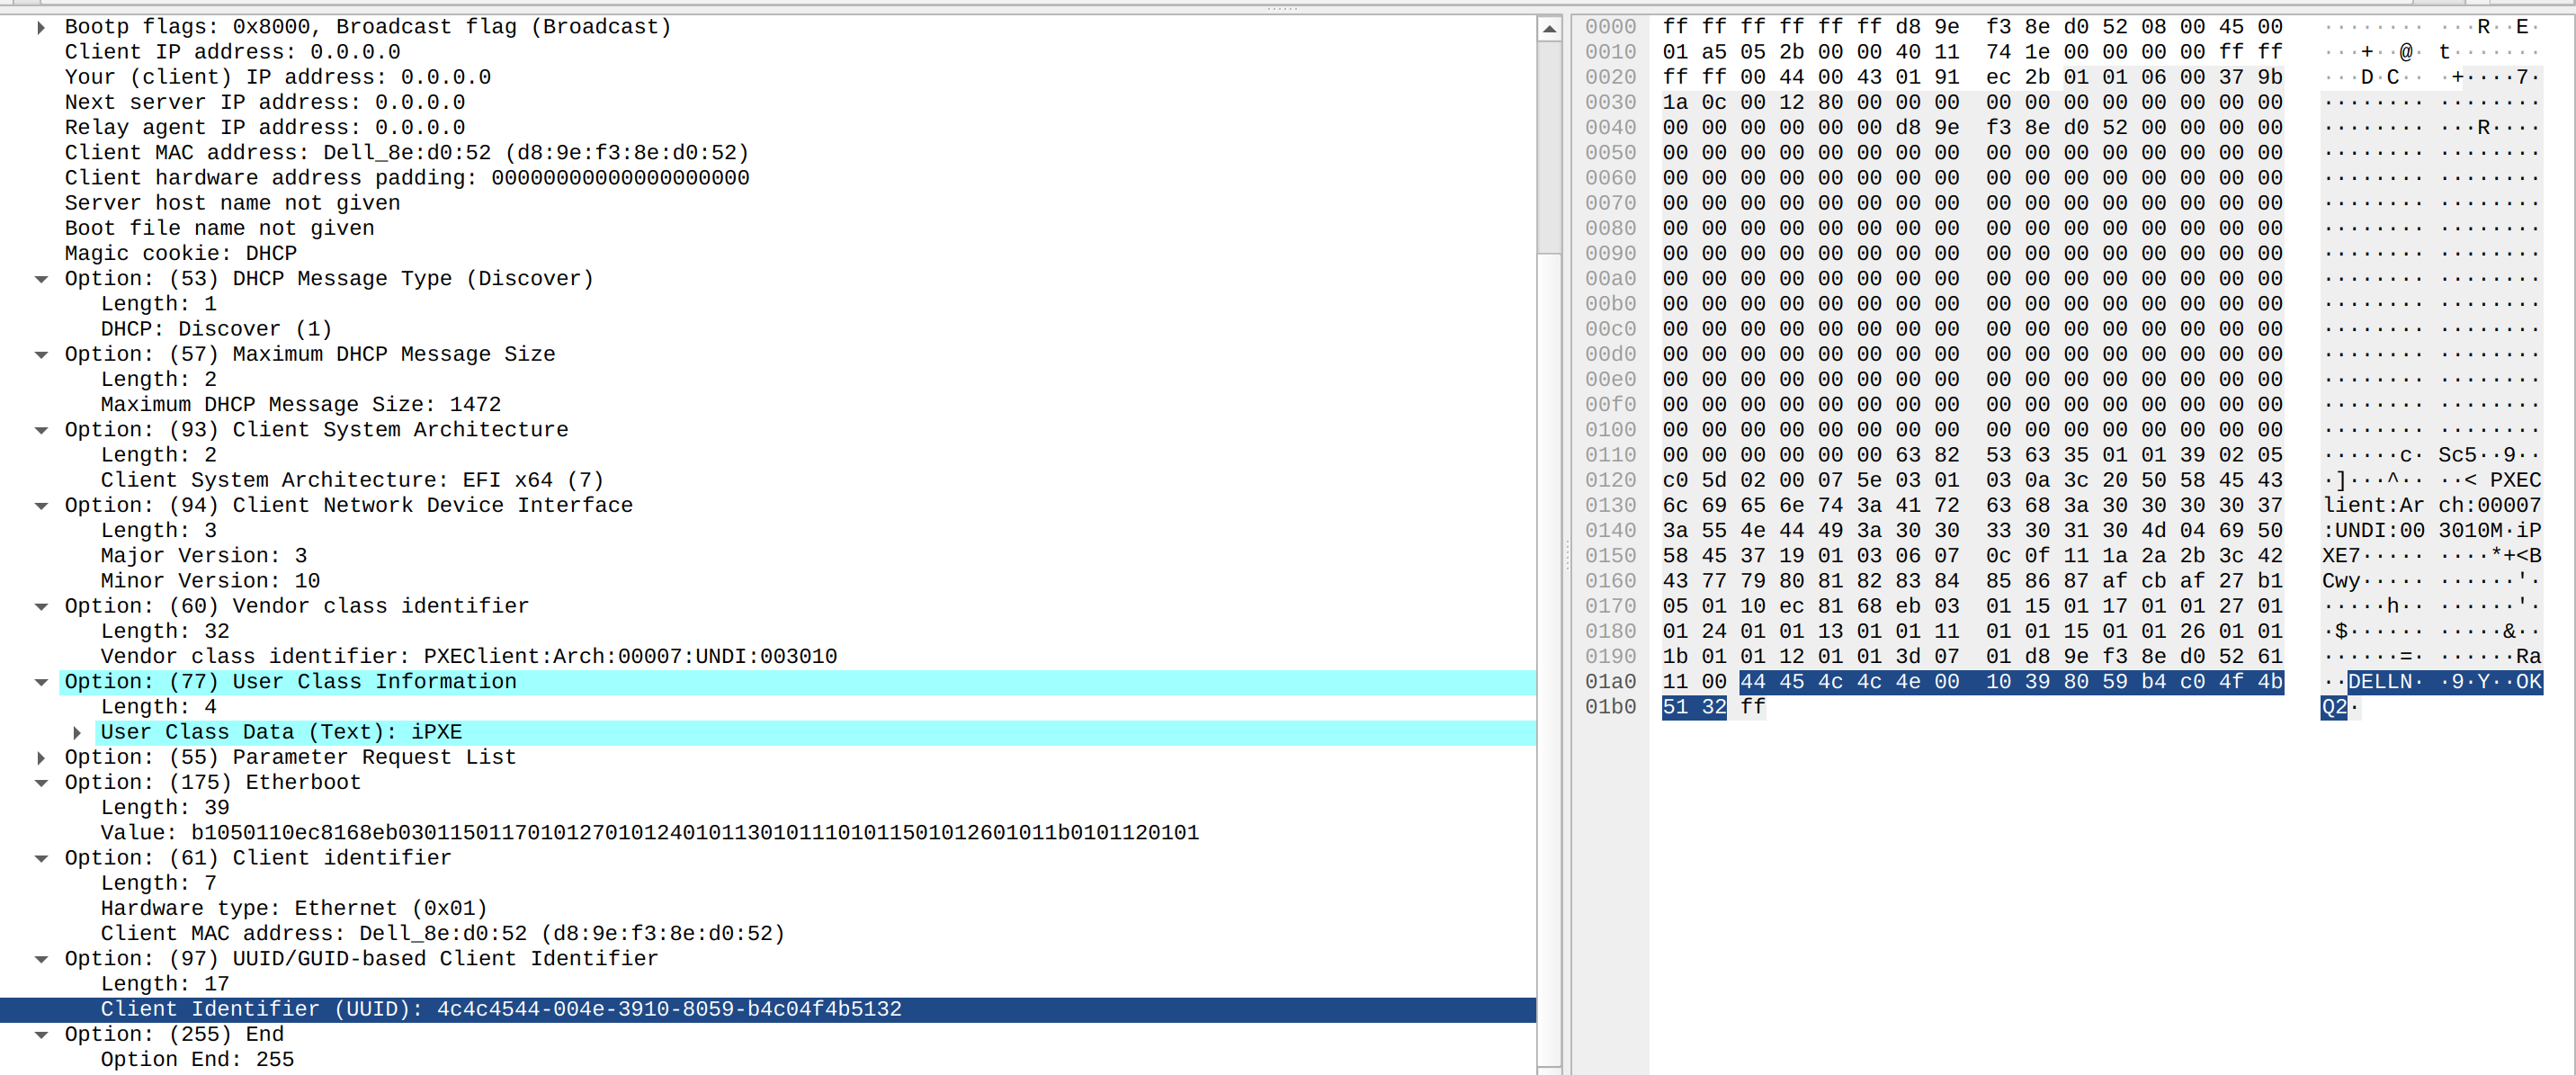
The iPXE bootloader is fetched (over TFTP) and executed, and then makes a second DHCPDISCOVER request (to get an IP since the network stack was restarted, and to get the Next Server IP Address to use to fetch the kernel/initrd files).
RPi Boot
Here is the DHCPDISCOVER for the Raspberry Pi, with its Vendor-Class Identifier set to PXEClient:Arch:00000:UNDI:002001.
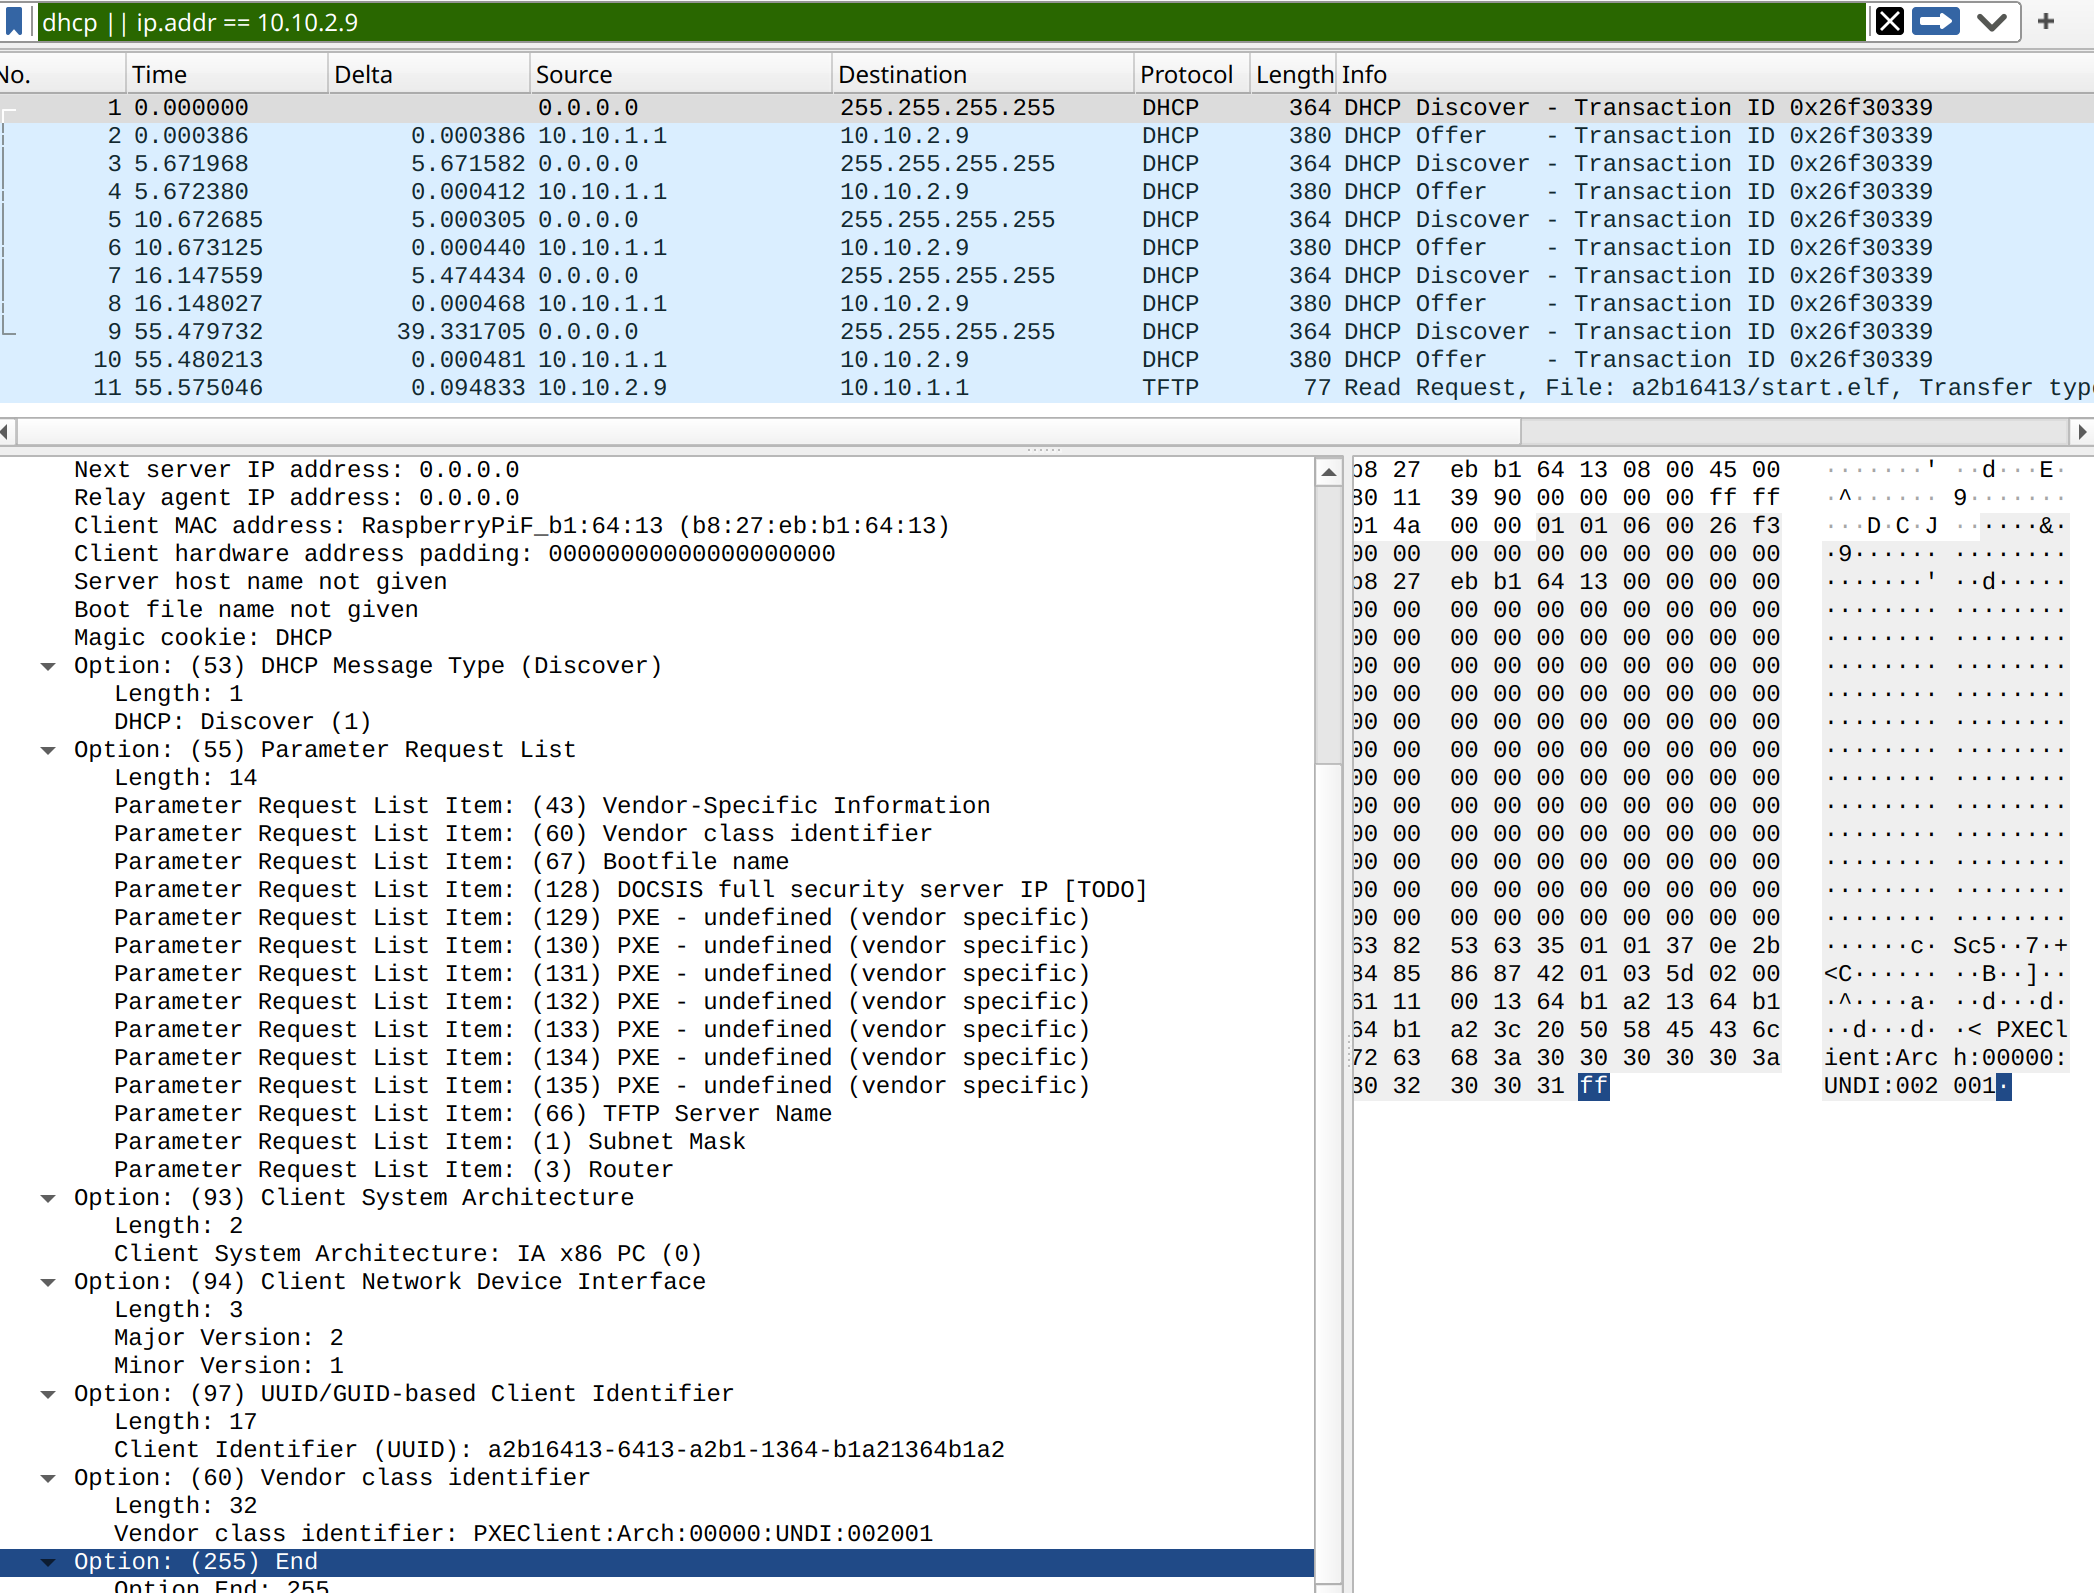
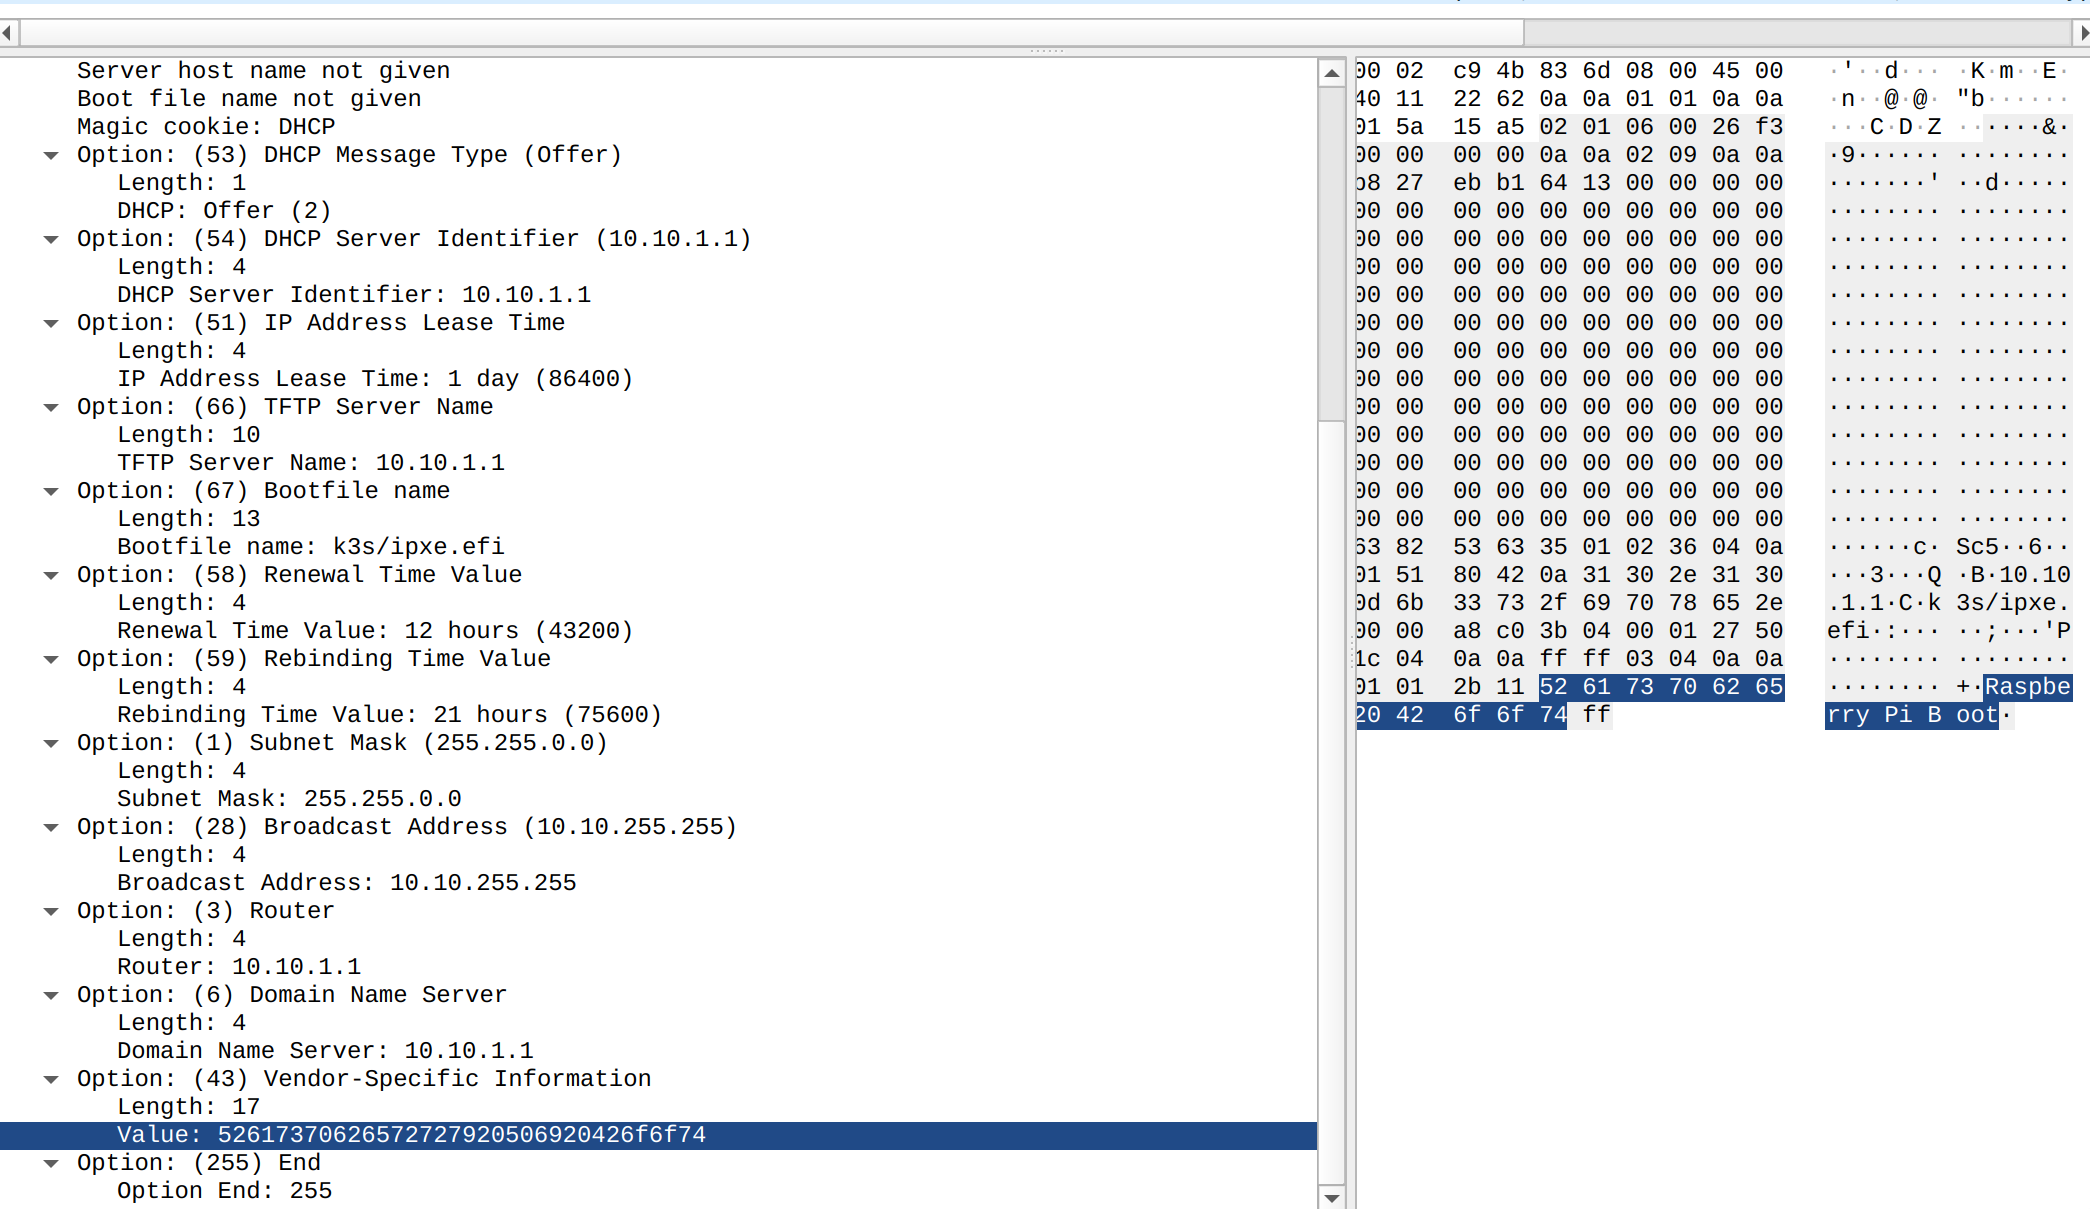
The DHCPOFFER in response contains:
- The
Vendor-Specific Informationset to “Raspberry Pi Boot” - All the usual DHCP values
- The
Bootfile Name(set to “k3s/ipxe.efi”), which is not used in this case
Sidenote on iSCSI
I used iSCSI in this case because I wanted to learn a new technology, but it could also be done using NFS.
Having an iSCSI server is also interesting in my case as, besides network booting, I can also use the remaining space on the SSD (I made two partitions) to mount it into my proxmox machine. Since both my storage server and proxmox server are equipped with Mellanox 10Gb SFP+ cards, I can also enable iSER: iSCSI Extensions for RDMA.
RDMA is a technology to access block devices over the network dramatically faster by bypassing most of the network stack. iSER is the implementation for iSCSI (this requires specific network cards). Another interesting (and more up-to-date) storage protocol is NVME-oF that is designed for SSD drives and supports multiple transports like TCP or RoCE (RDMA).
References
- https://sources.debian.org/src/open-iscsi/2.0.874-7.1/debian/README.Debian/
- https://linuxhit.com/build-a-raspberry-pi-image-packer-packer-builder-arm/
- https://developer.hashicorp.com/packer/docs/builders/community-supported
- https://warmestrobot.com/blog/2024/06/27/raspberry-pi-network-boot-guide-2/
- https://vwannabe.com/2024/01/11/cloning-linux-a-step-by-step-guide-to-booting-from-iscsi-lun/
- https://forum.level1techs.com/t/gnu-linux-installation-server-ipxe-menu-sanboot/186919
- https://romain.therrat.fr/posts/2011/04/iscsi-installation-dun-serveur-iscsi-sous-debian-et-connexion-dun-client/
- https://wiki.debian.org/SAN/iSCSI/LIO
- https://manpages.ubuntu.com/manpages/jammy/man8/targetctl.8.html
- https://ipxe.org/cmd/kernel
- https://ipxe.org/embed
- https://www.raspberrypi.com/documentation/computers/raspberry-pi.html#network-booting
- https://kb.isc.org/docs/standard-dhcp-options
- https://www.rfc-editor.org/rfc/rfc2132